
A field guide to the 40 Acres platform
The 40 Acres dashboard is where your business raises payment orders and invoices, runs trades and manages its addresses and counterparties. This guide covers the dashboard, screen by screen.
The user guide
Everything a business does day to day: from raising an invoice to running a trade and keeping the address whitelist current.
Overview
The dashboard is where your business moves value: raise payment orders and invoices, execute trades, and keep your address whitelist and counterparty book current. The main areas sit in the left sidebar after sign-in, and the create flows — new order, new trade, new address — open from buttons on those screens. If your workspace uses approval controls, some actions pause in Approvals for sign-off before they take effect; the sections below call this out where it applies. When the 40 Acres team schedules maintenance, a banner at the top of the dashboard announces the window and a notice goes out by email; the platform may be unavailable while it runs.
- Sign in with your registered email and two-factor code
- Complete verification before raising your first order
- Use the left sidebar to move between areas at any time
Onboarding
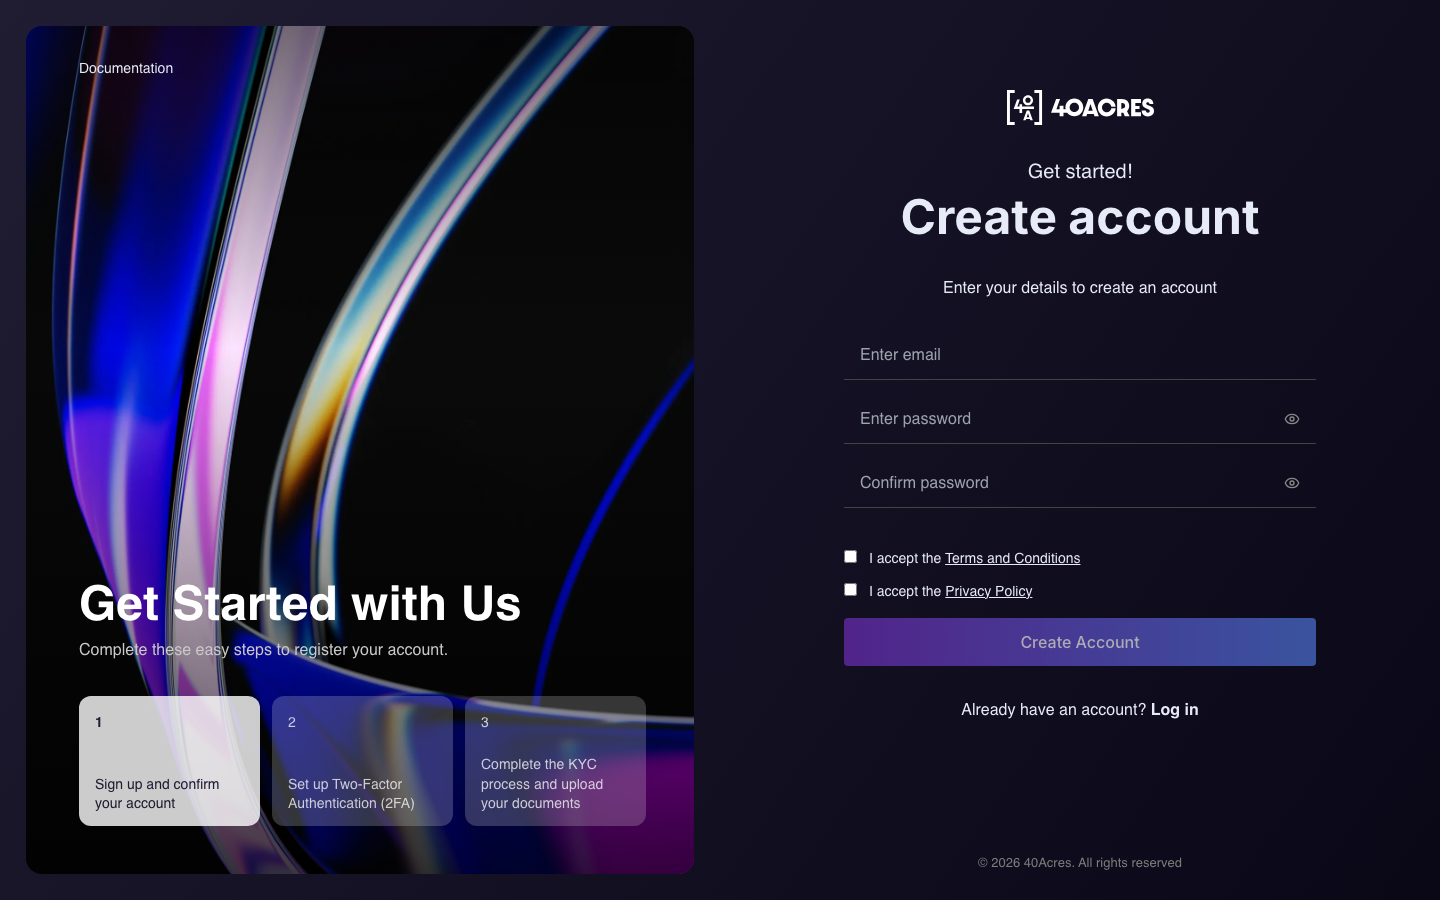
Getting set up happens once. Create your account, confirm your email, sign in and set up two-factor authentication, then complete verification by uploading your documents. Full access opens once review is complete and approved. Passwords must be at least 12 characters. After repeated failed sign-ins you see Too many sign-in attempts and sign-in pauses for a few minutes — wait, then try again, or use Forgot your password? if you no longer know it. Depending on your business, verification can involve more than one form — each is presented in turn on the verification screen, and features unlock as the relevant review completes.
- Check spam if the confirmation email does not arrive
- Set up two-factor authentication on first sign-in
- Upload verification documents early: review takes time
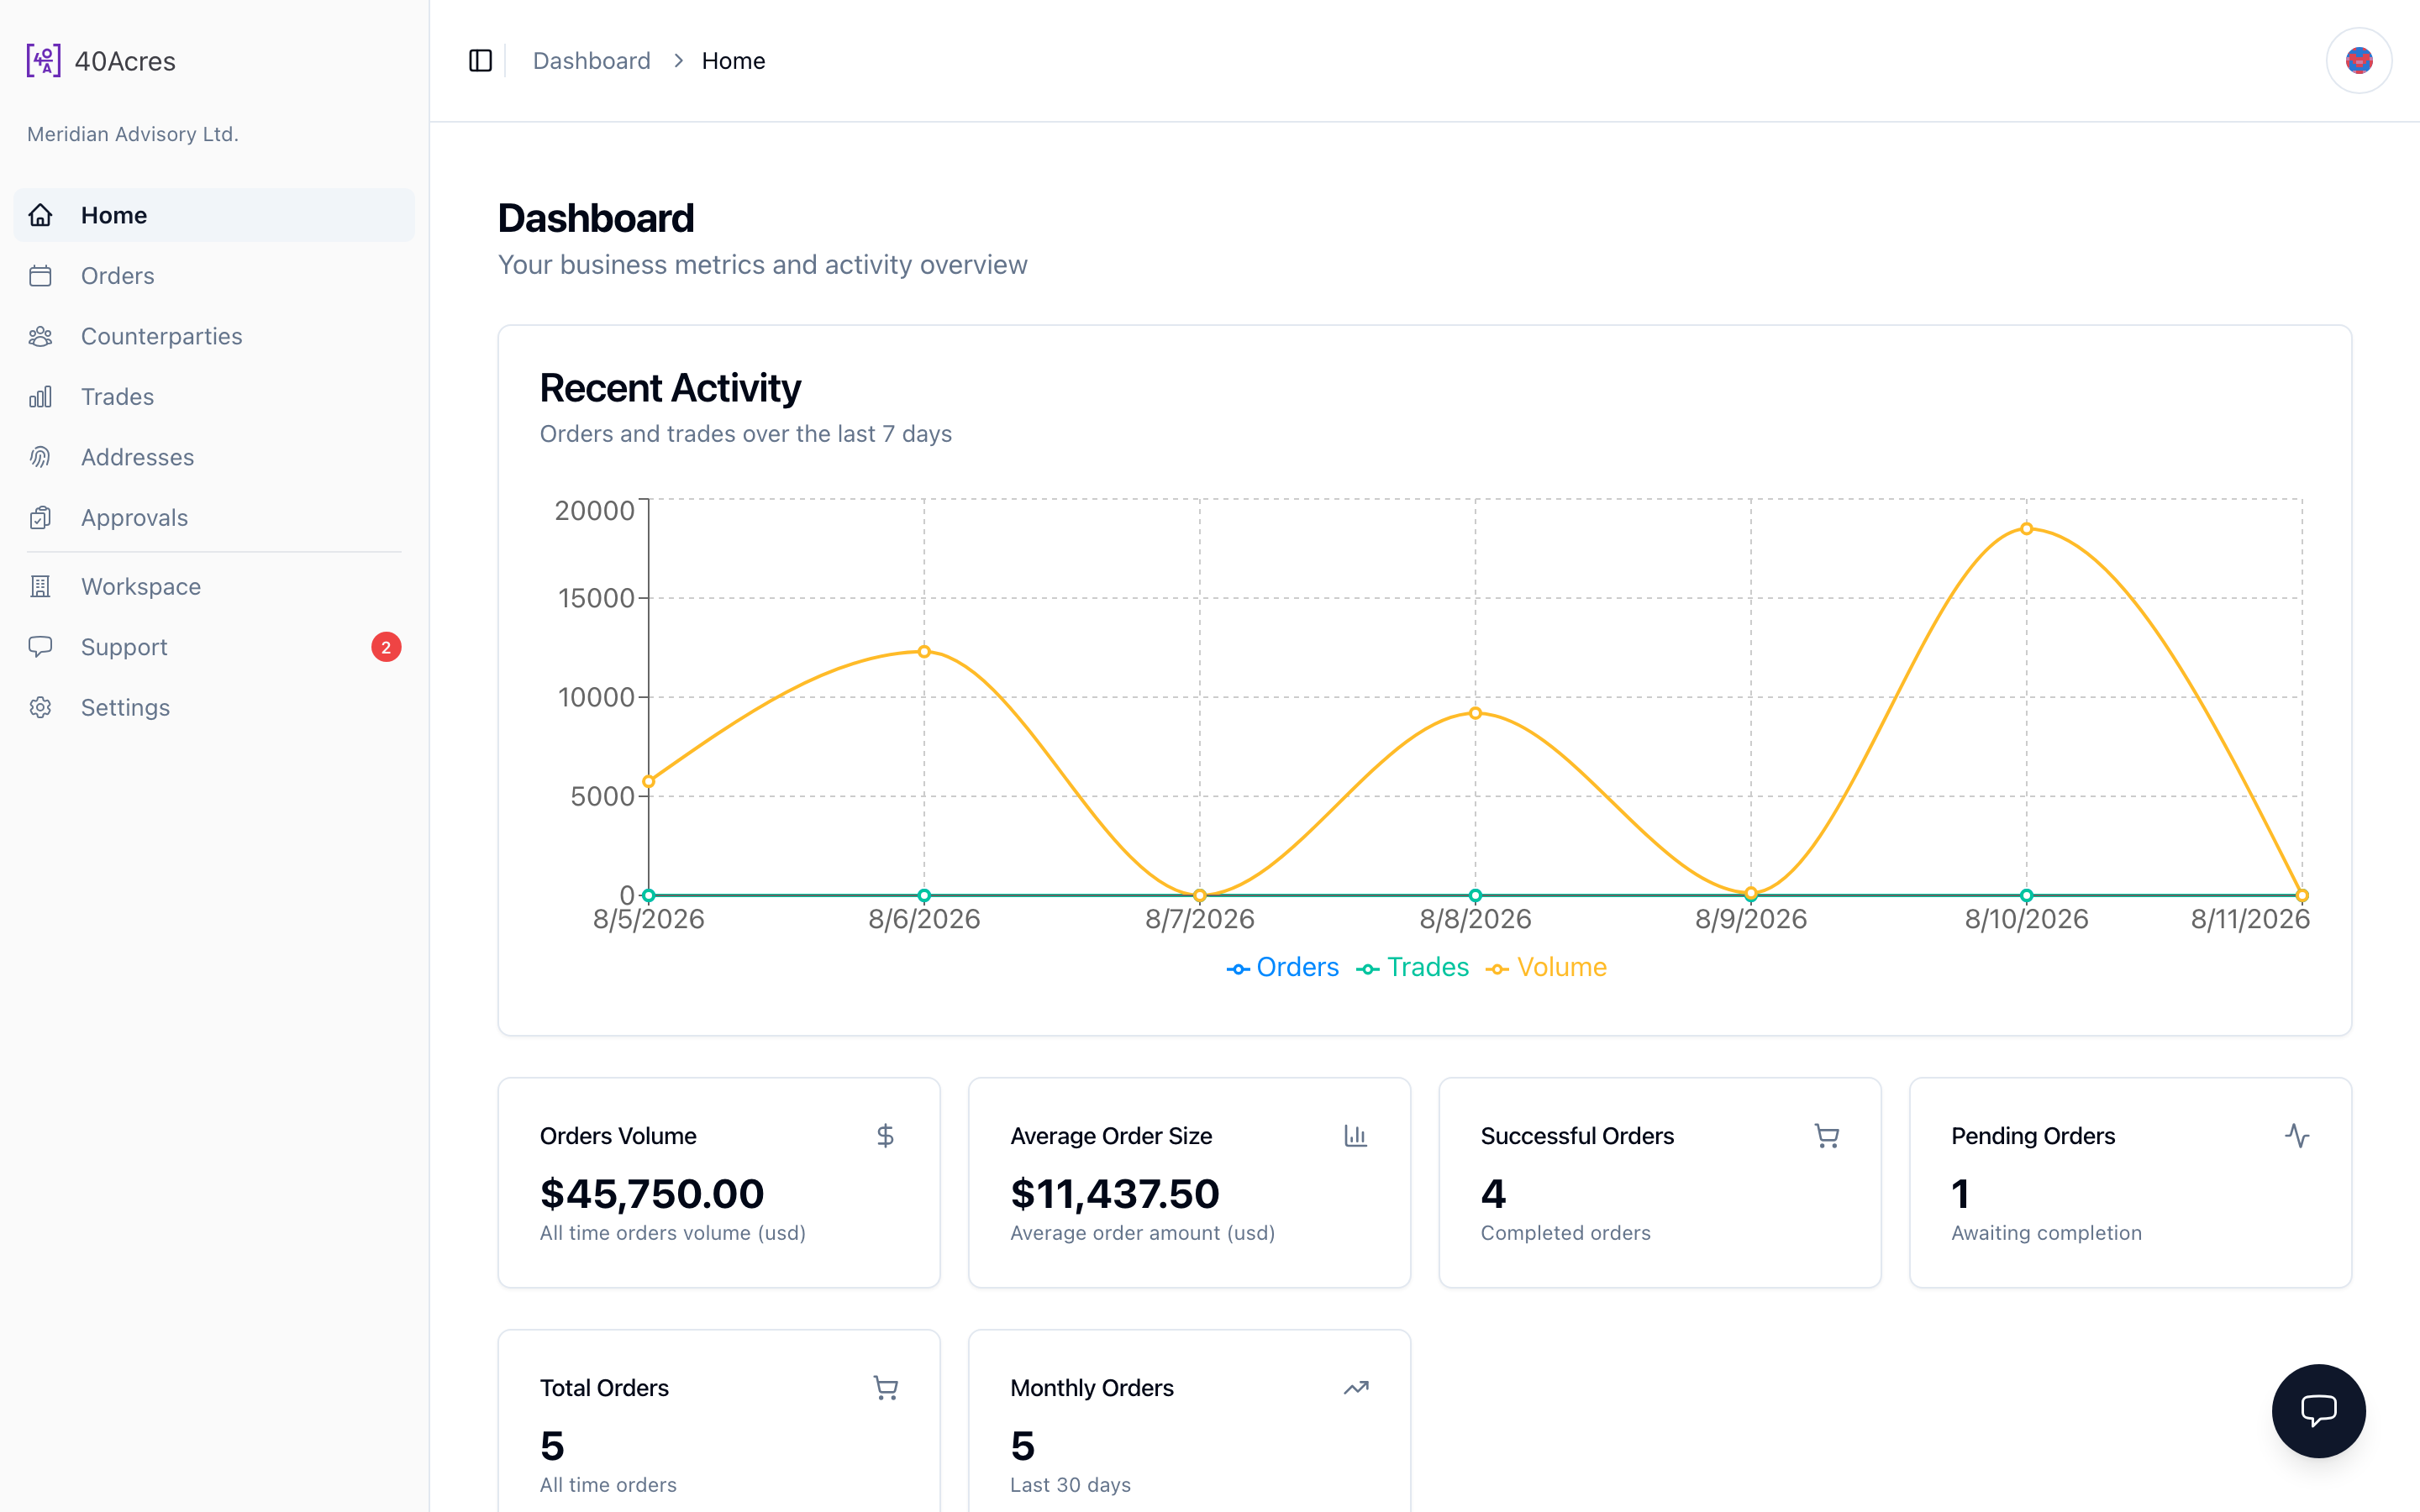
Dashboard
The landing screen after sign-in: your activity at a glance. A chart of order and trade activity over the last 7 days sits at the top, with headline figures underneath — orders volume, average order size, and successful and pending order counts — followed by monthly totals and asset-usage and status breakdowns. Trading metrics appear alongside them where your workspace tier includes trading.
- Scan the 7-day activity chart for anything unexpected
- Read the volume and order-count figures
- Jump to any area from the left sidebar
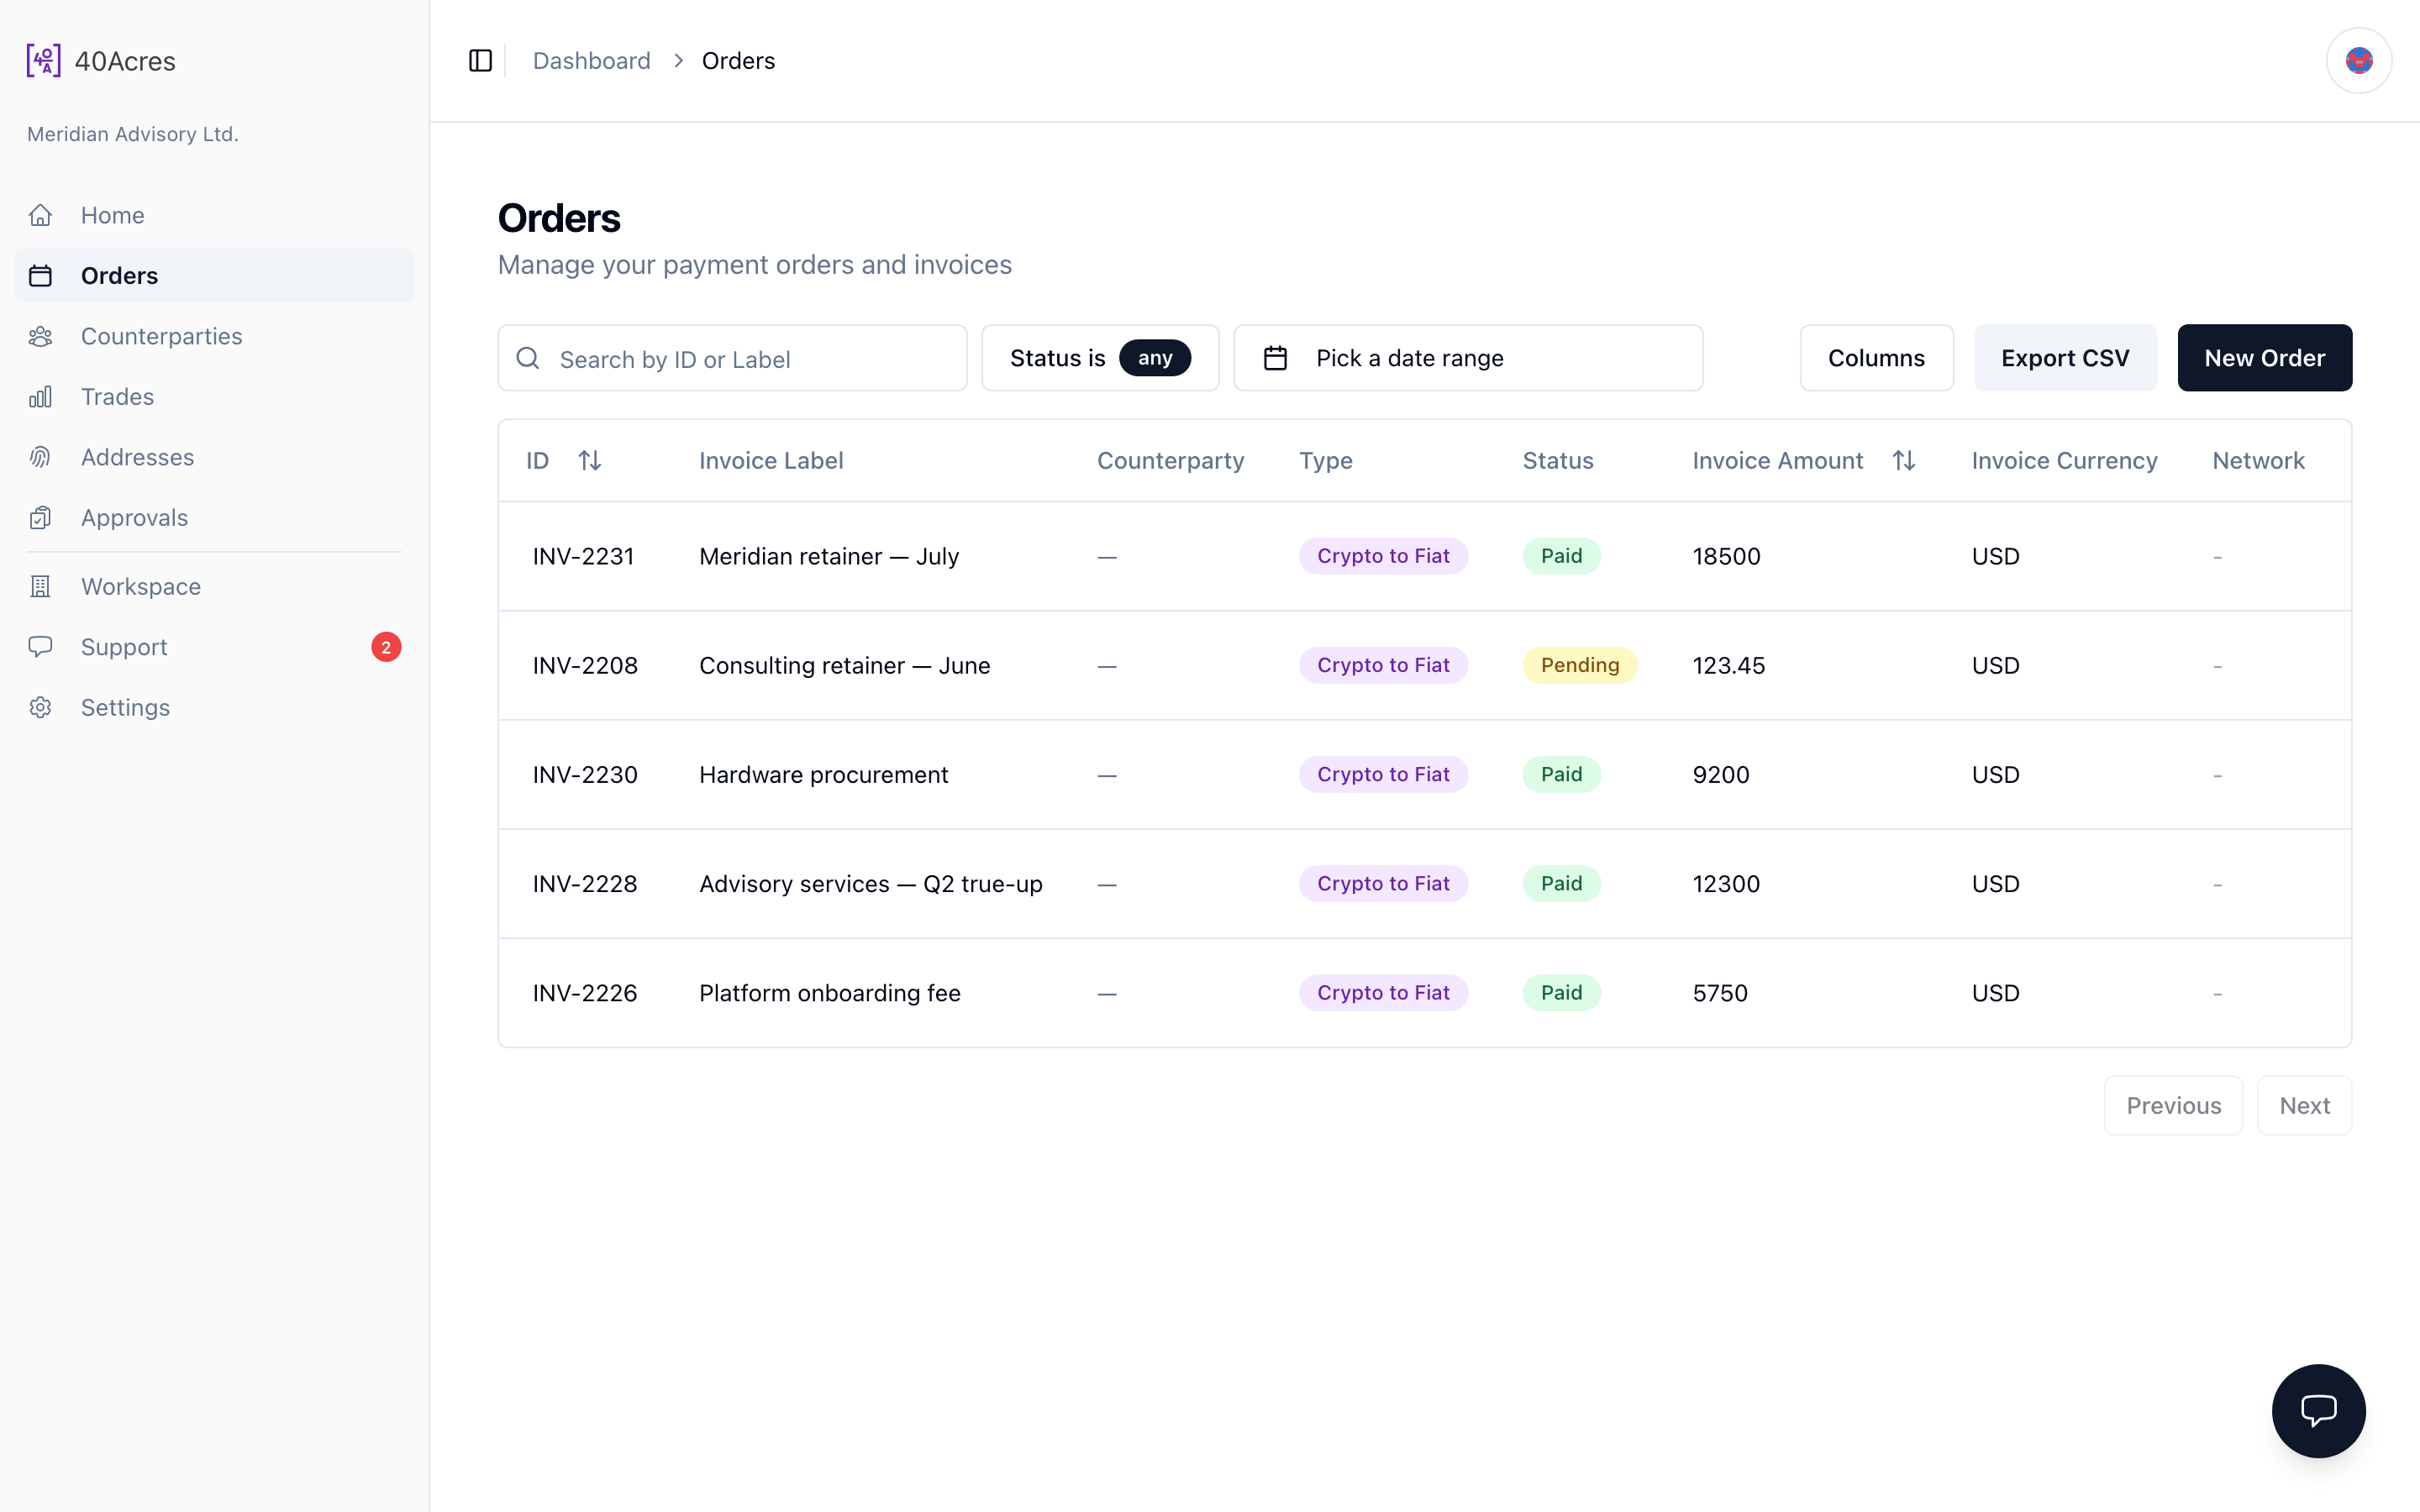
Orders
Every payment order and invoice your business has raised, newest first. Statuses run Pending, Processing, then Paid — with Funds sent marking a crypto-to-fiat invoice whose fiat has been sent to your bank (arrival time depends on your bank). Underfunded and Overfunded flag payments outside the tolerance band. Past Due marks an invoice past its due date (it returns to Pending if the due date is extended); Cancelled and Failed cover orders that did not complete, and Expired appears only on non-invoice payment orders that lapsed. Settlement completes within 2 business days. Open any order's full detail with the eye icon; the actions menu adapts to the order — Download and Copy payment link on invoices, Open link while it is payable, Resend top-up email when underfunded, and Cancel Order while it is still pending.
- Search by ID, label or counterparty; filter by status or date range
- Open an order with the eye icon; manage it from its actions menu
- Export the current view as CSV
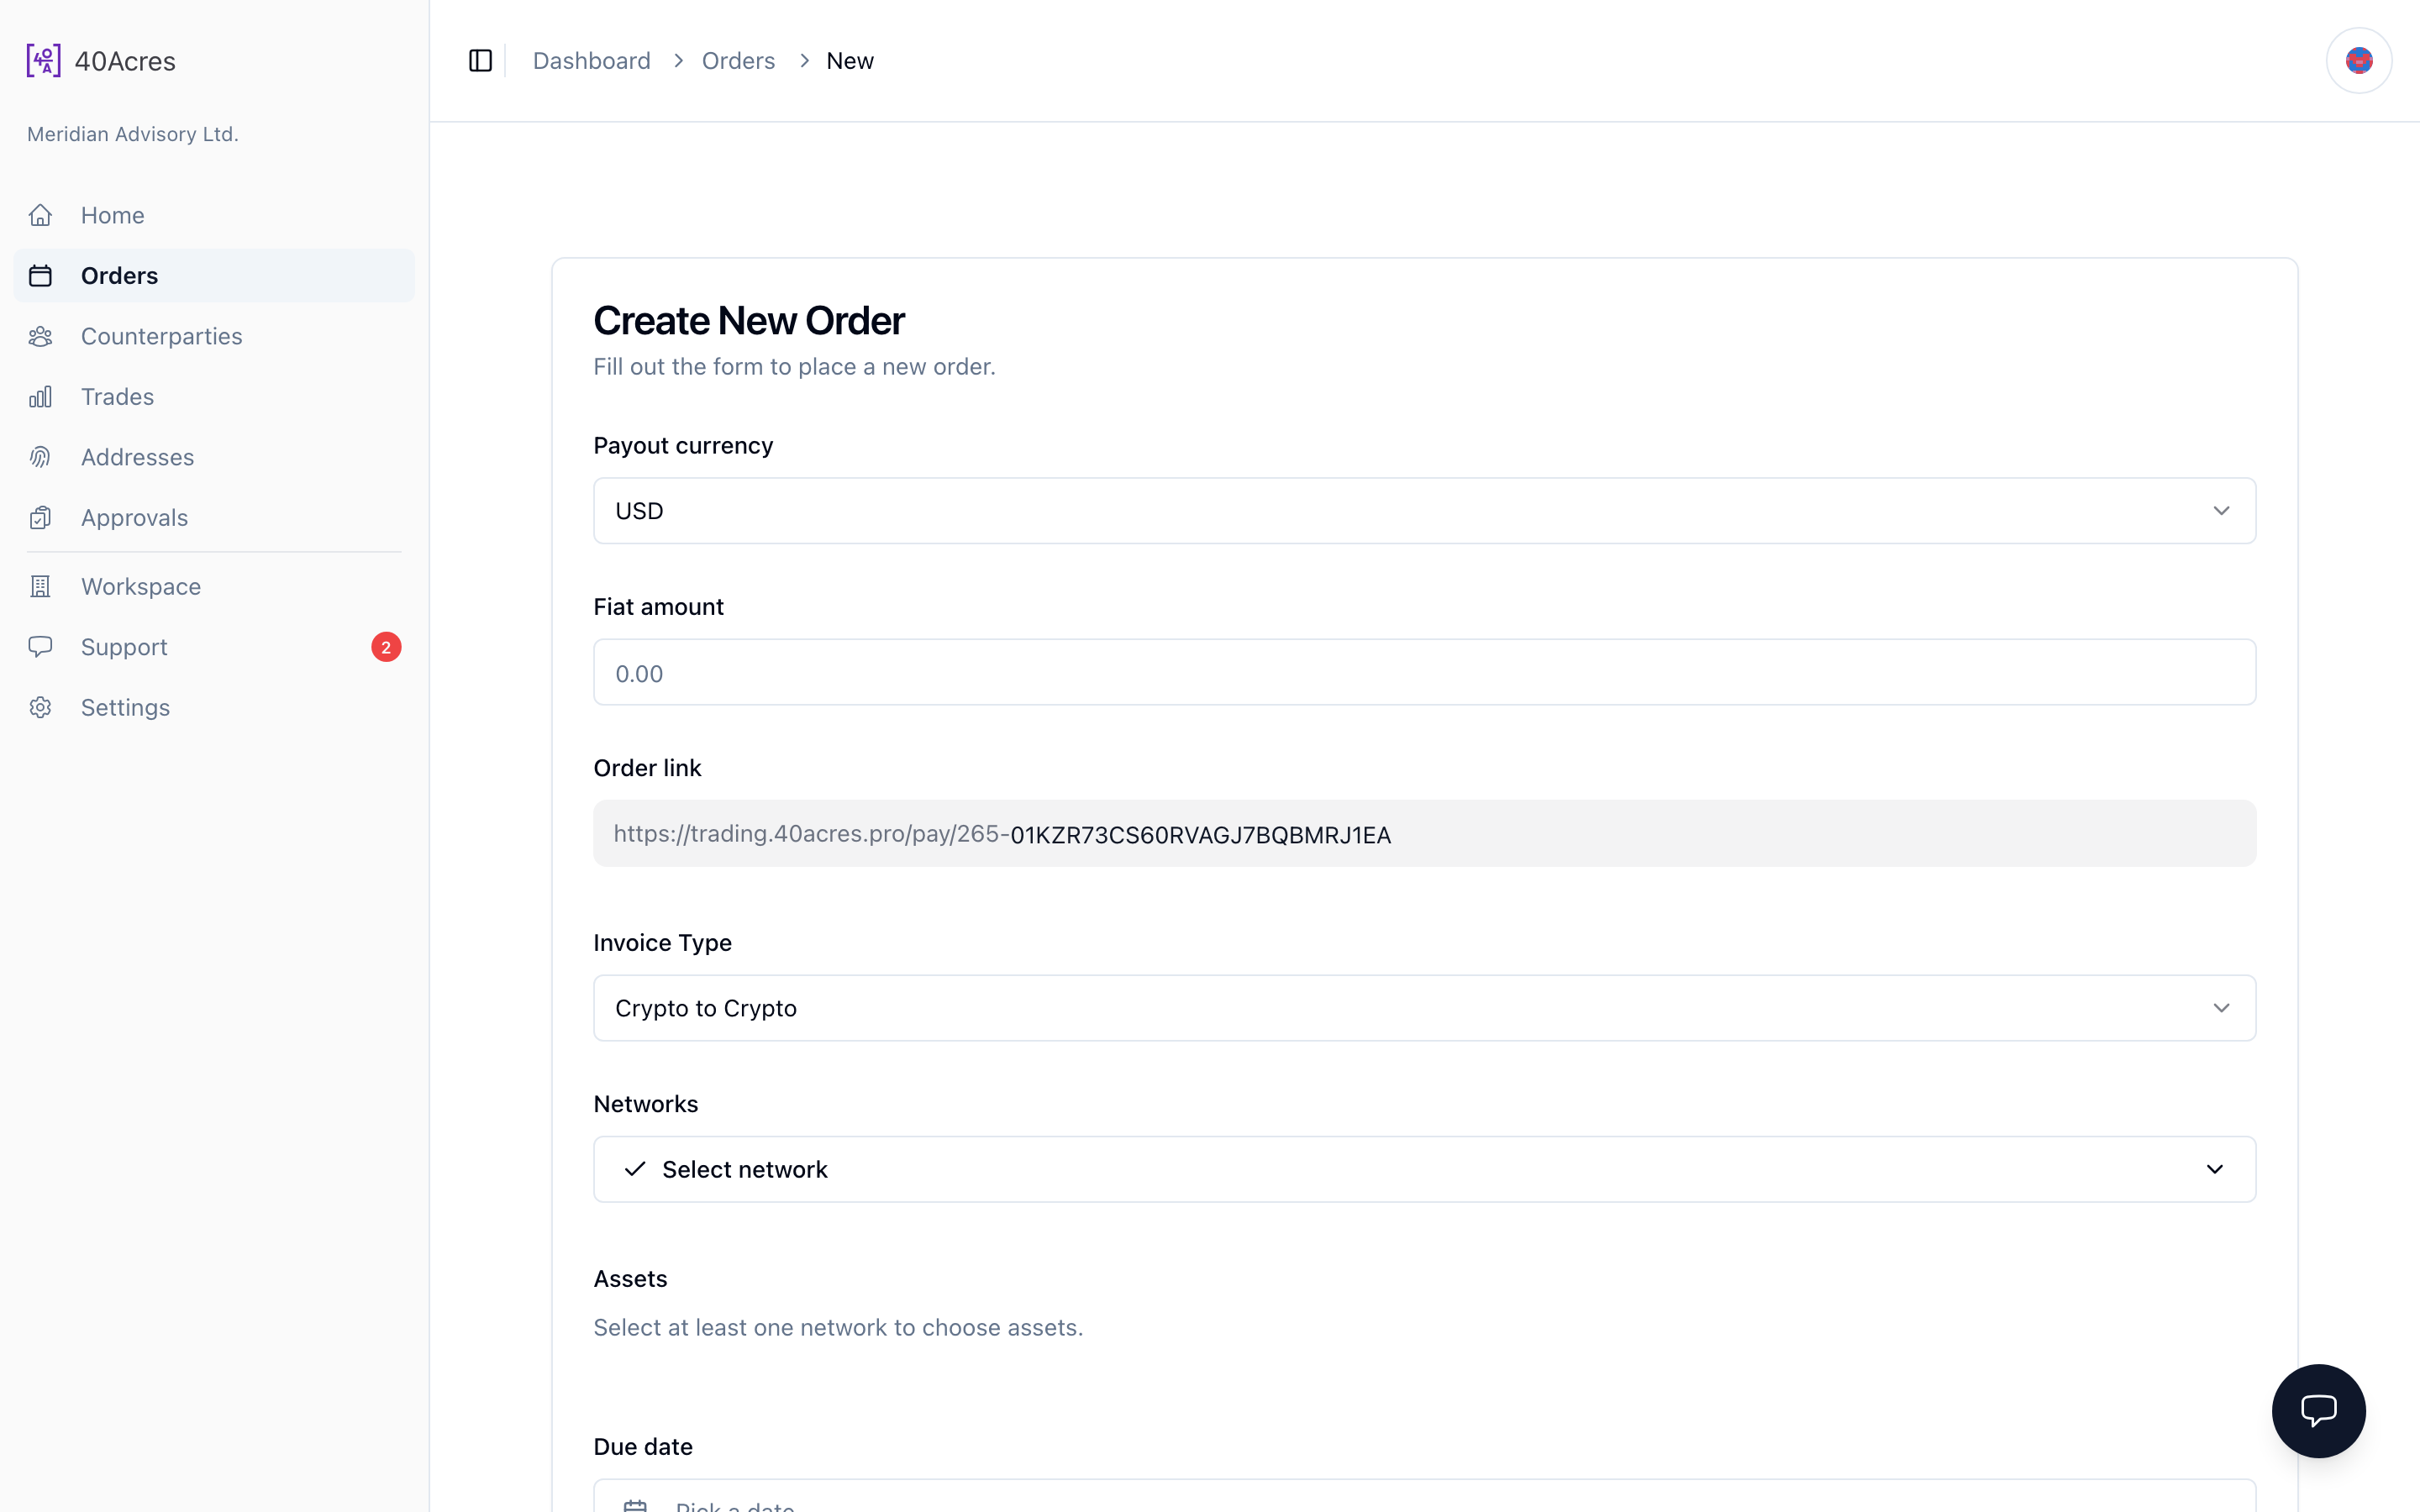
Create order
Raise an invoice in one form. Your client pays in crypto; 40 Acres then settles your business in fiat. The Payout currency selector sets which fiat currency you are settled in — it defaults to your account's own currency. Set the fiat amount and the networks and assets your client can pay with — advanced accounts also choose the invoice type, and crypto-to-crypto invoices settle in crypto to whitelisted settlement addresses instead — then the due date, label and client details. The order link is generated automatically, and you can customize it. If your workspace requires order approval, clicking Create submits the order for sign-off instead — it appears under Approvals, and the order is created and the invoice email sent only once an approver approves it. Without approval controls, adding a client email means the invoice goes out the moment you click Create.
- Choose the fiat currency to be settled in; set the amount, networks, assets and due date; pick settlement addresses for crypto-to-crypto
- Add the client email; attach the invoice PDF and a short reason
- Click Create — the invoice is emailed to your client on creation, or once approved if your workspace requires order approval
Invoice payment: the client view
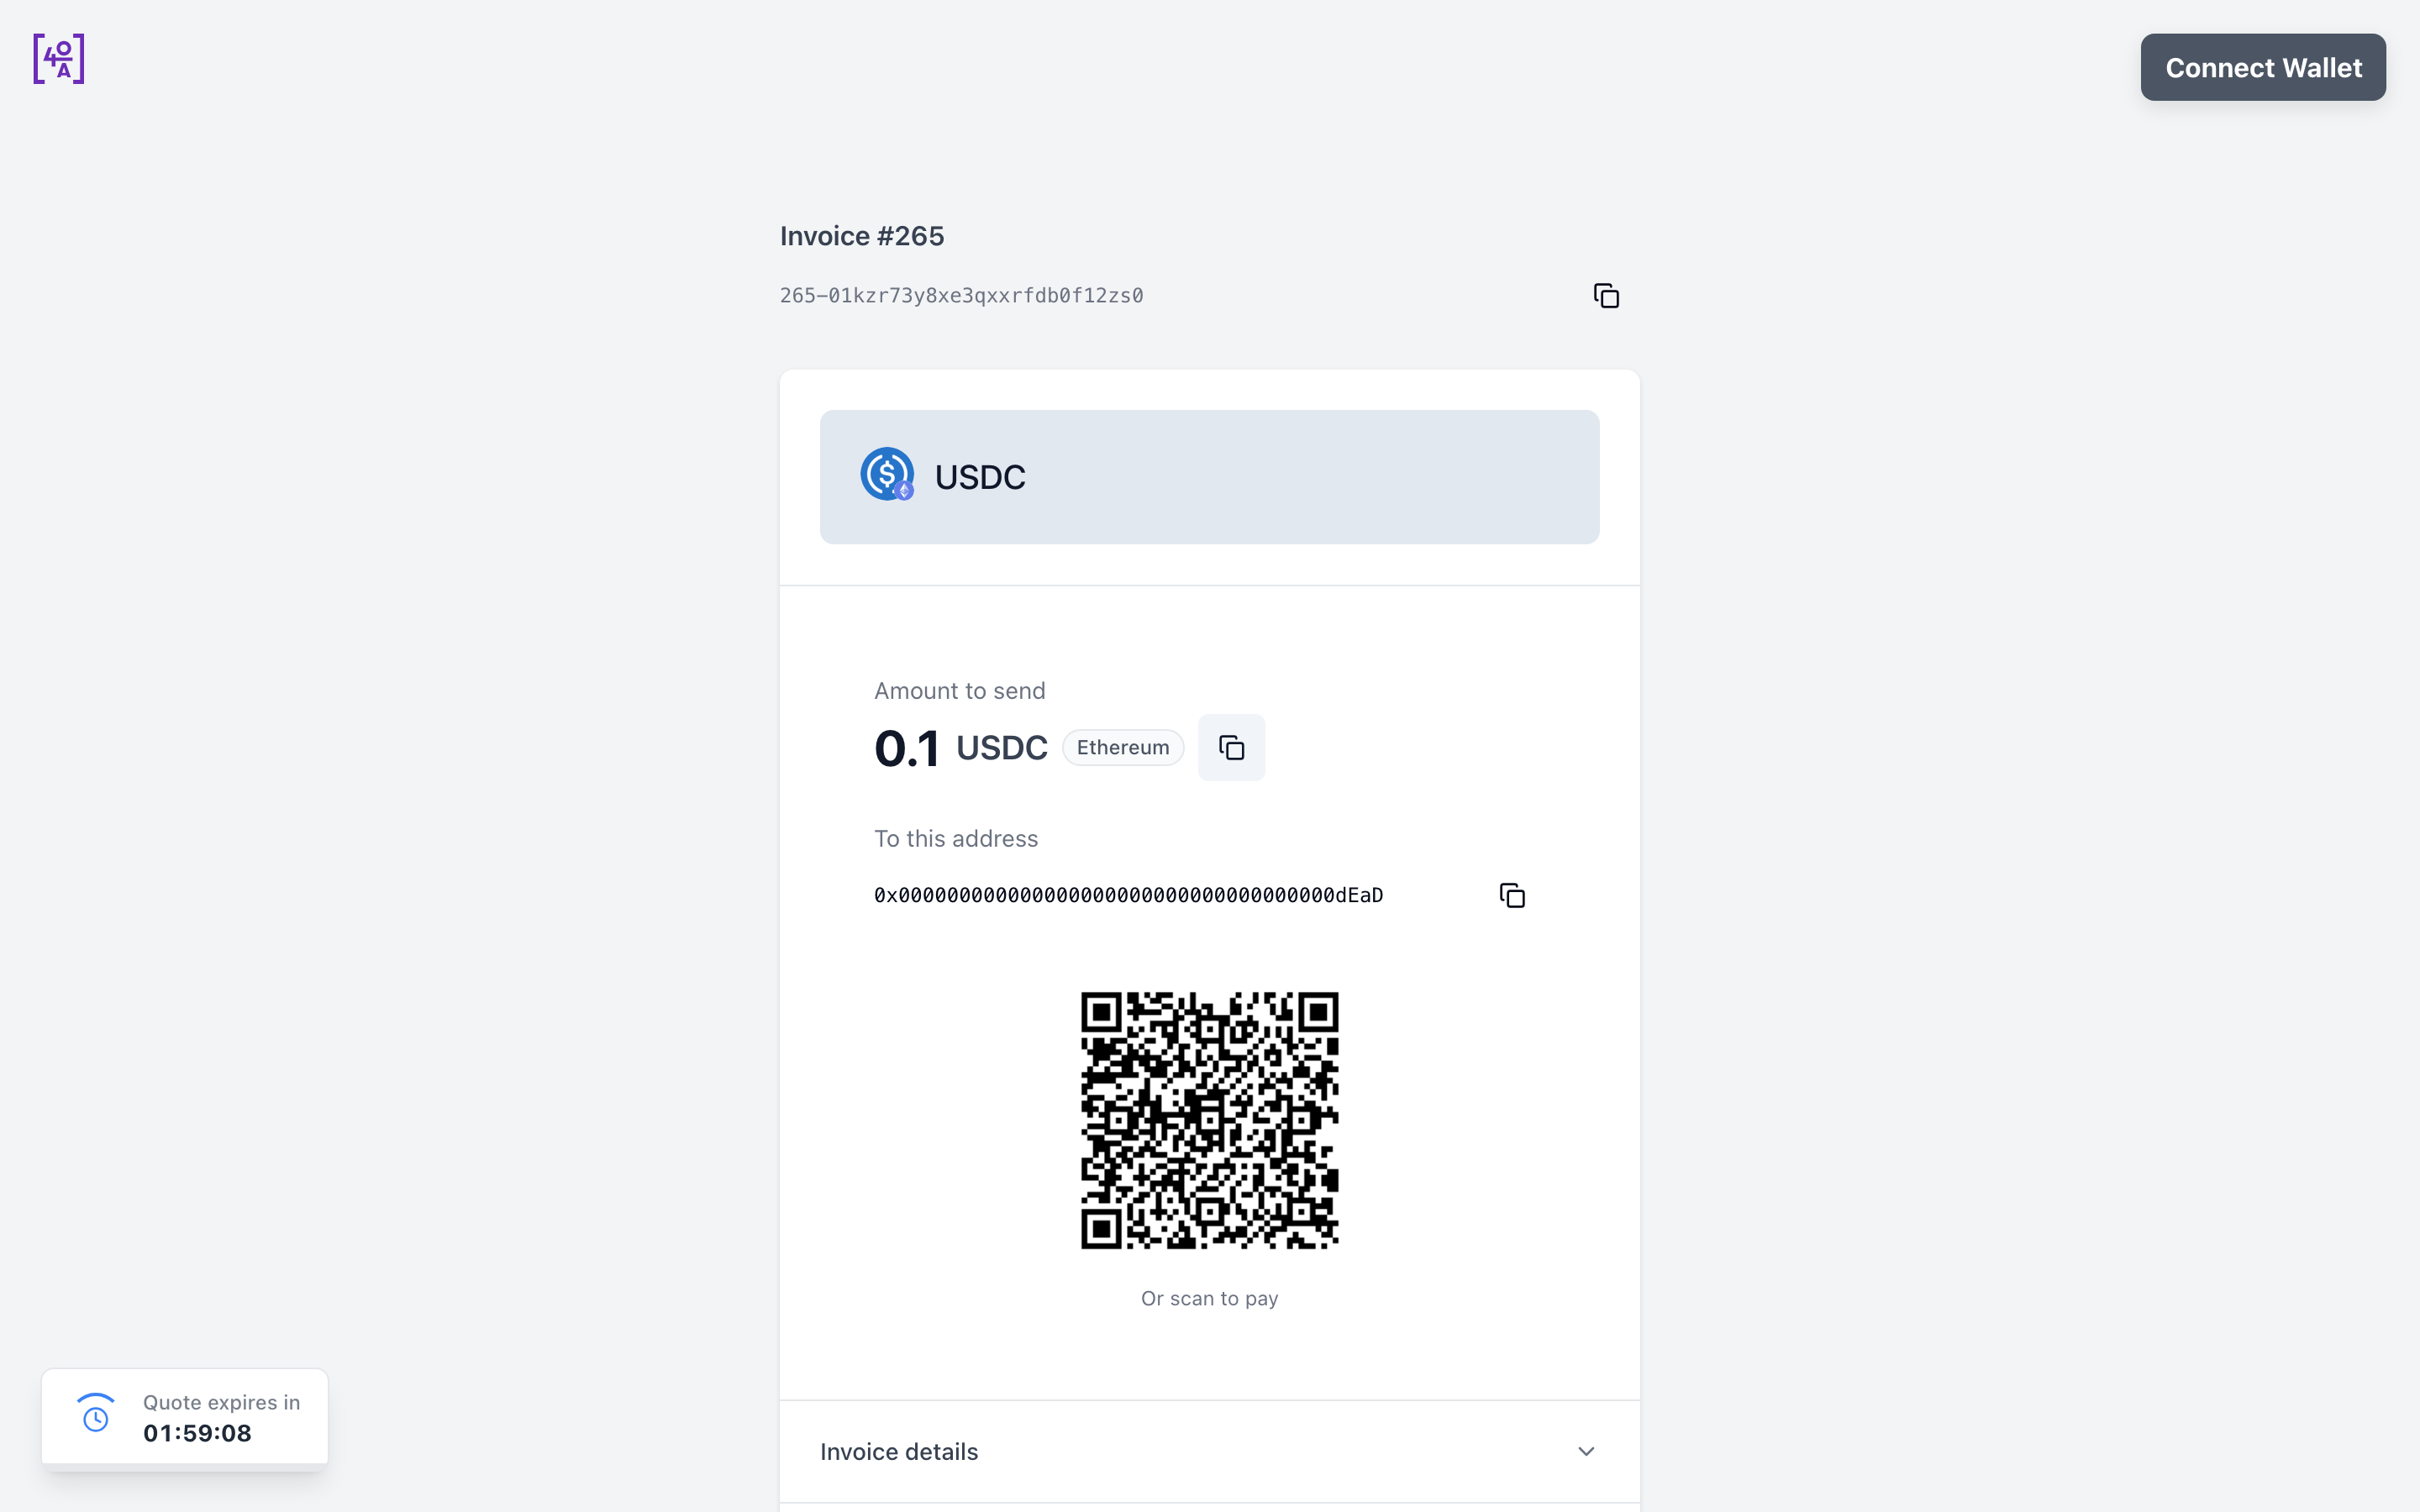
What your client sees when they open the order link: a payment page with the invoice amount converted into their chosen asset, the deposit address, and a QR code. Invoice details and the attached PDF sit on the same page. The client sends the exact amount shown, or connects a wallet and proceeds to payment. The page accepts payment while the order is Pending or Underfunded; once a deposit is detected it shows the payment's progress, and a paid invoice simply confirms that no further payment is needed.
- Client selects the asset to pay with
- Client sends the exact amount to the address, or scans the QR code
- Payment is matched to your order automatically once confirmed
Counterparties
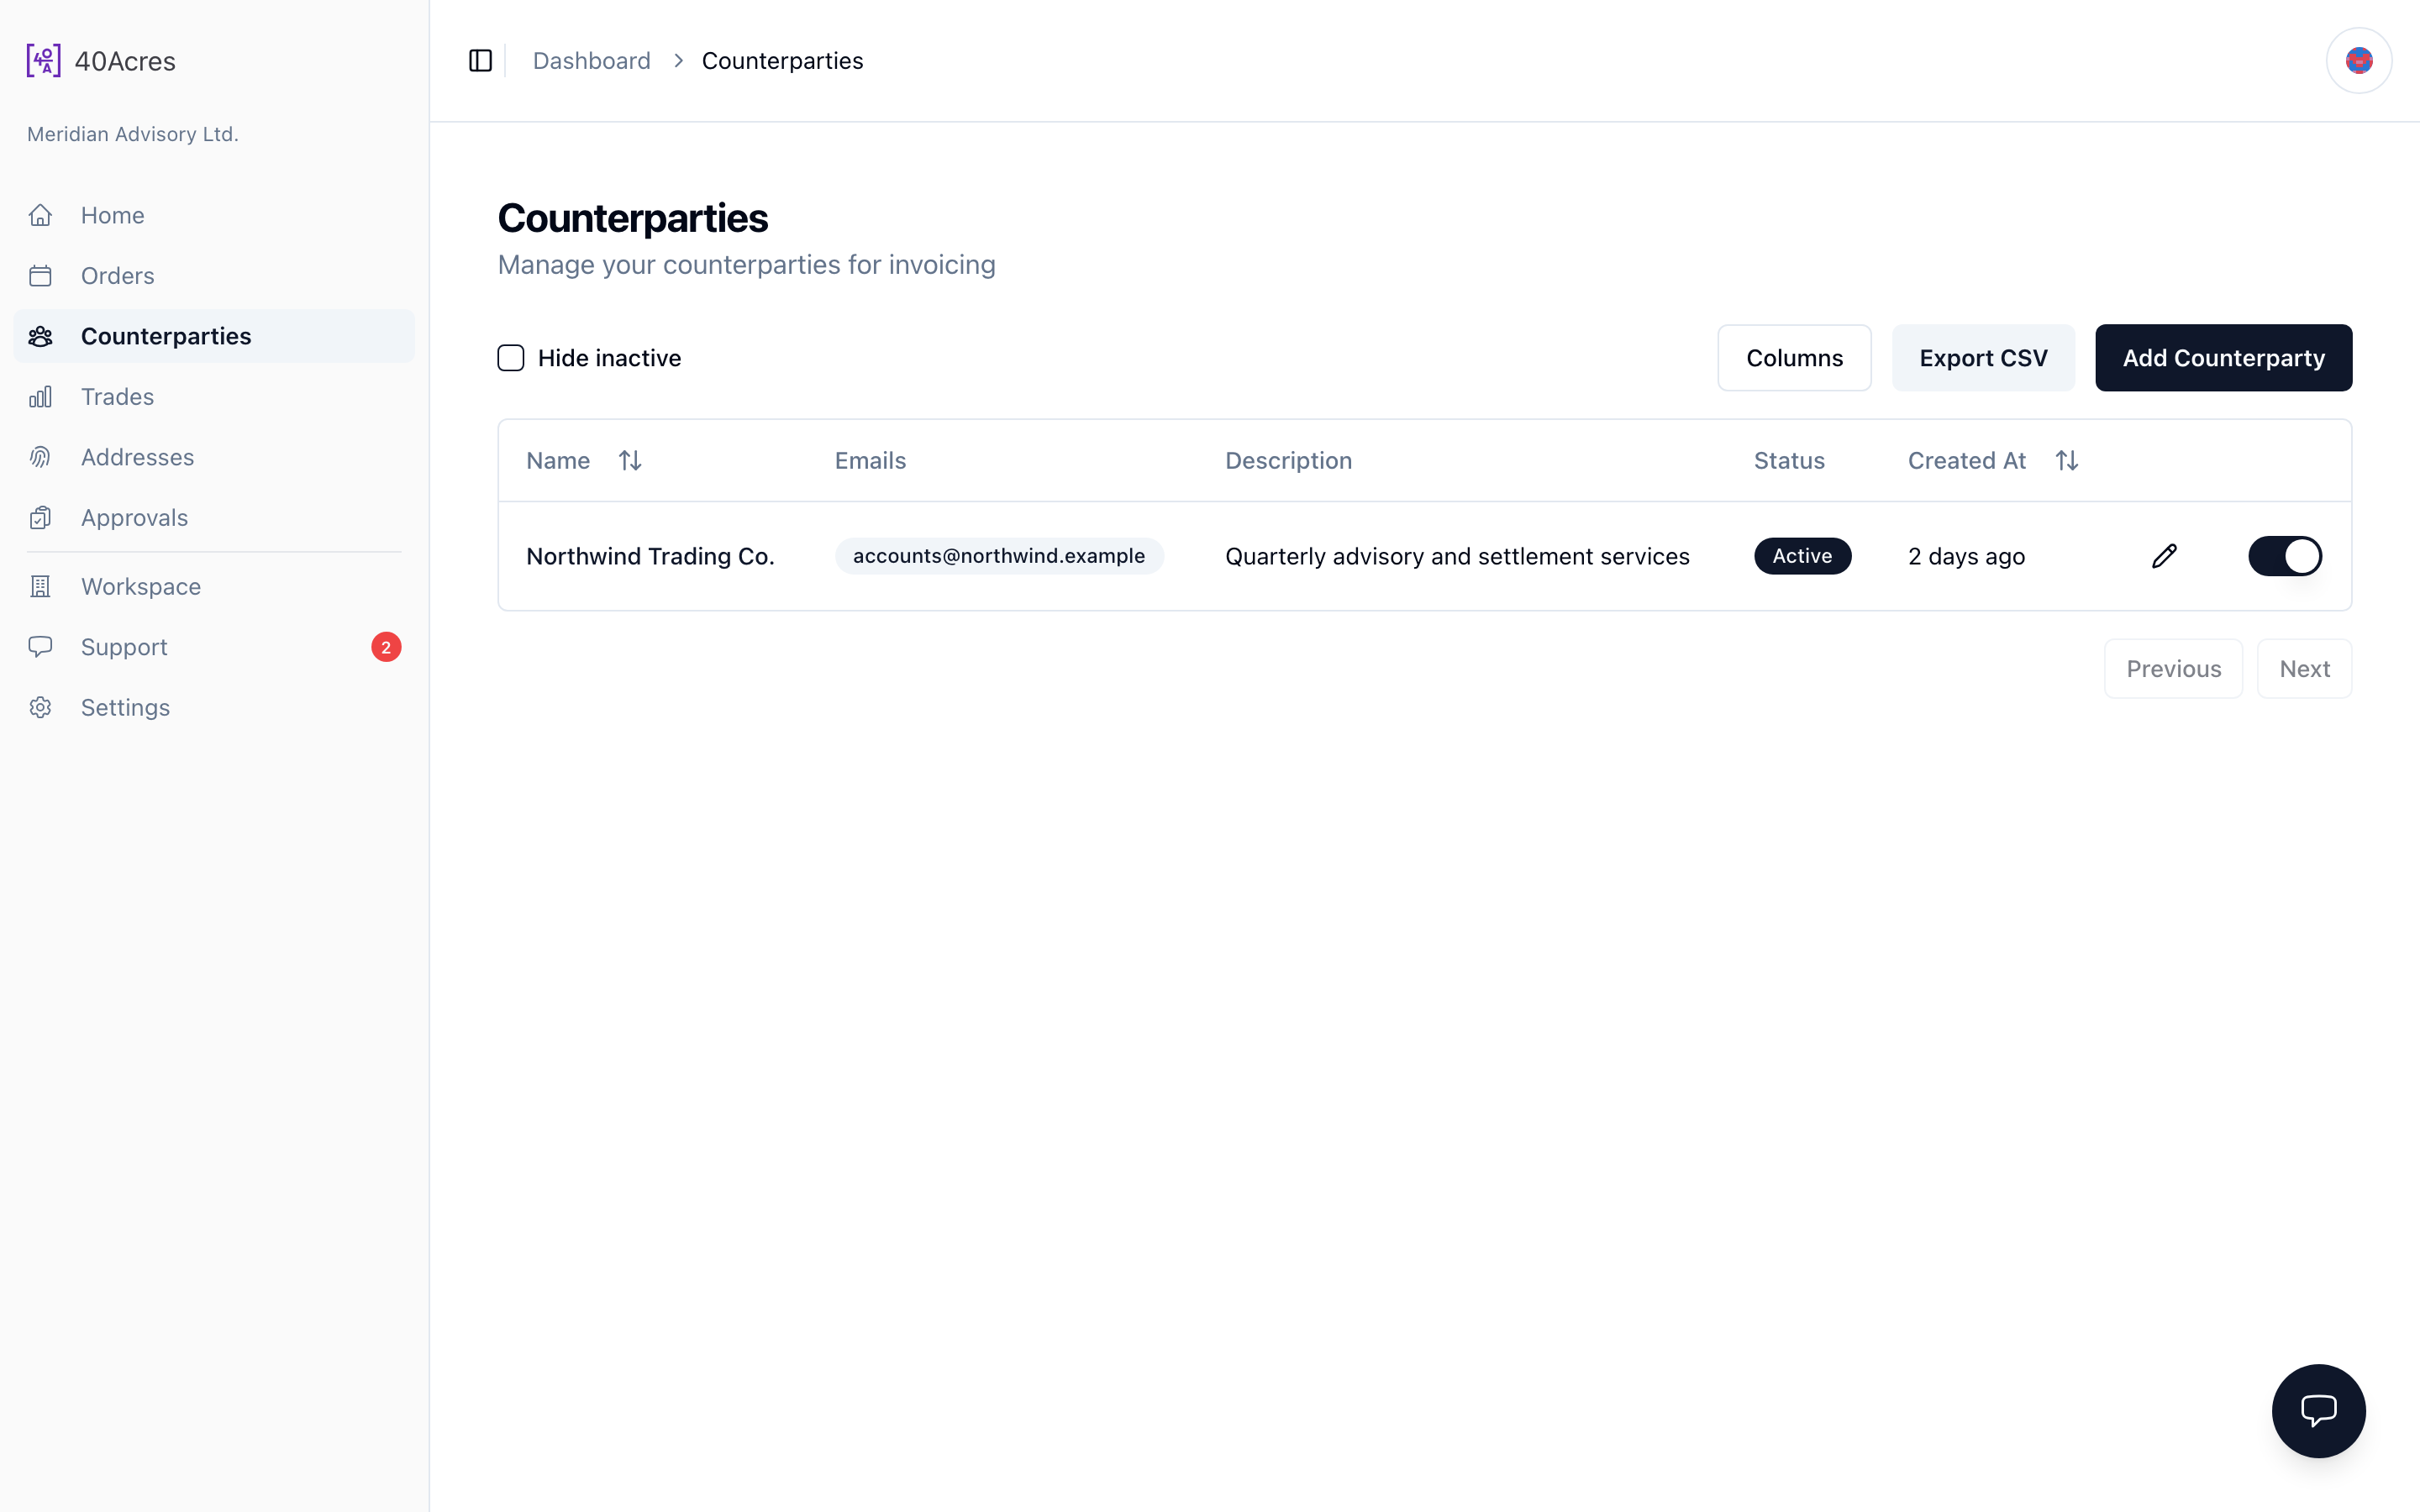
The book of entities you transact with. Attach a counterparty when raising an invoice to link it to that entity and carry its details onto the generated invoice PDF, and open a counterparty's record to see every order raised against it. Counterparties are screened by compliance: the Screening column shows Screened, Under compliance review or Blocked, and only a screened counterparty can be used on a new invoice — one under review waits until compliance clears it.
- Review a counterparty before raising an invoice against it
- Check the Screening column before raising an invoice: a counterparty under compliance review cannot be used until it is cleared
- Open a record for its full order history
- Keep contact details and service descriptions current
Add counterparty
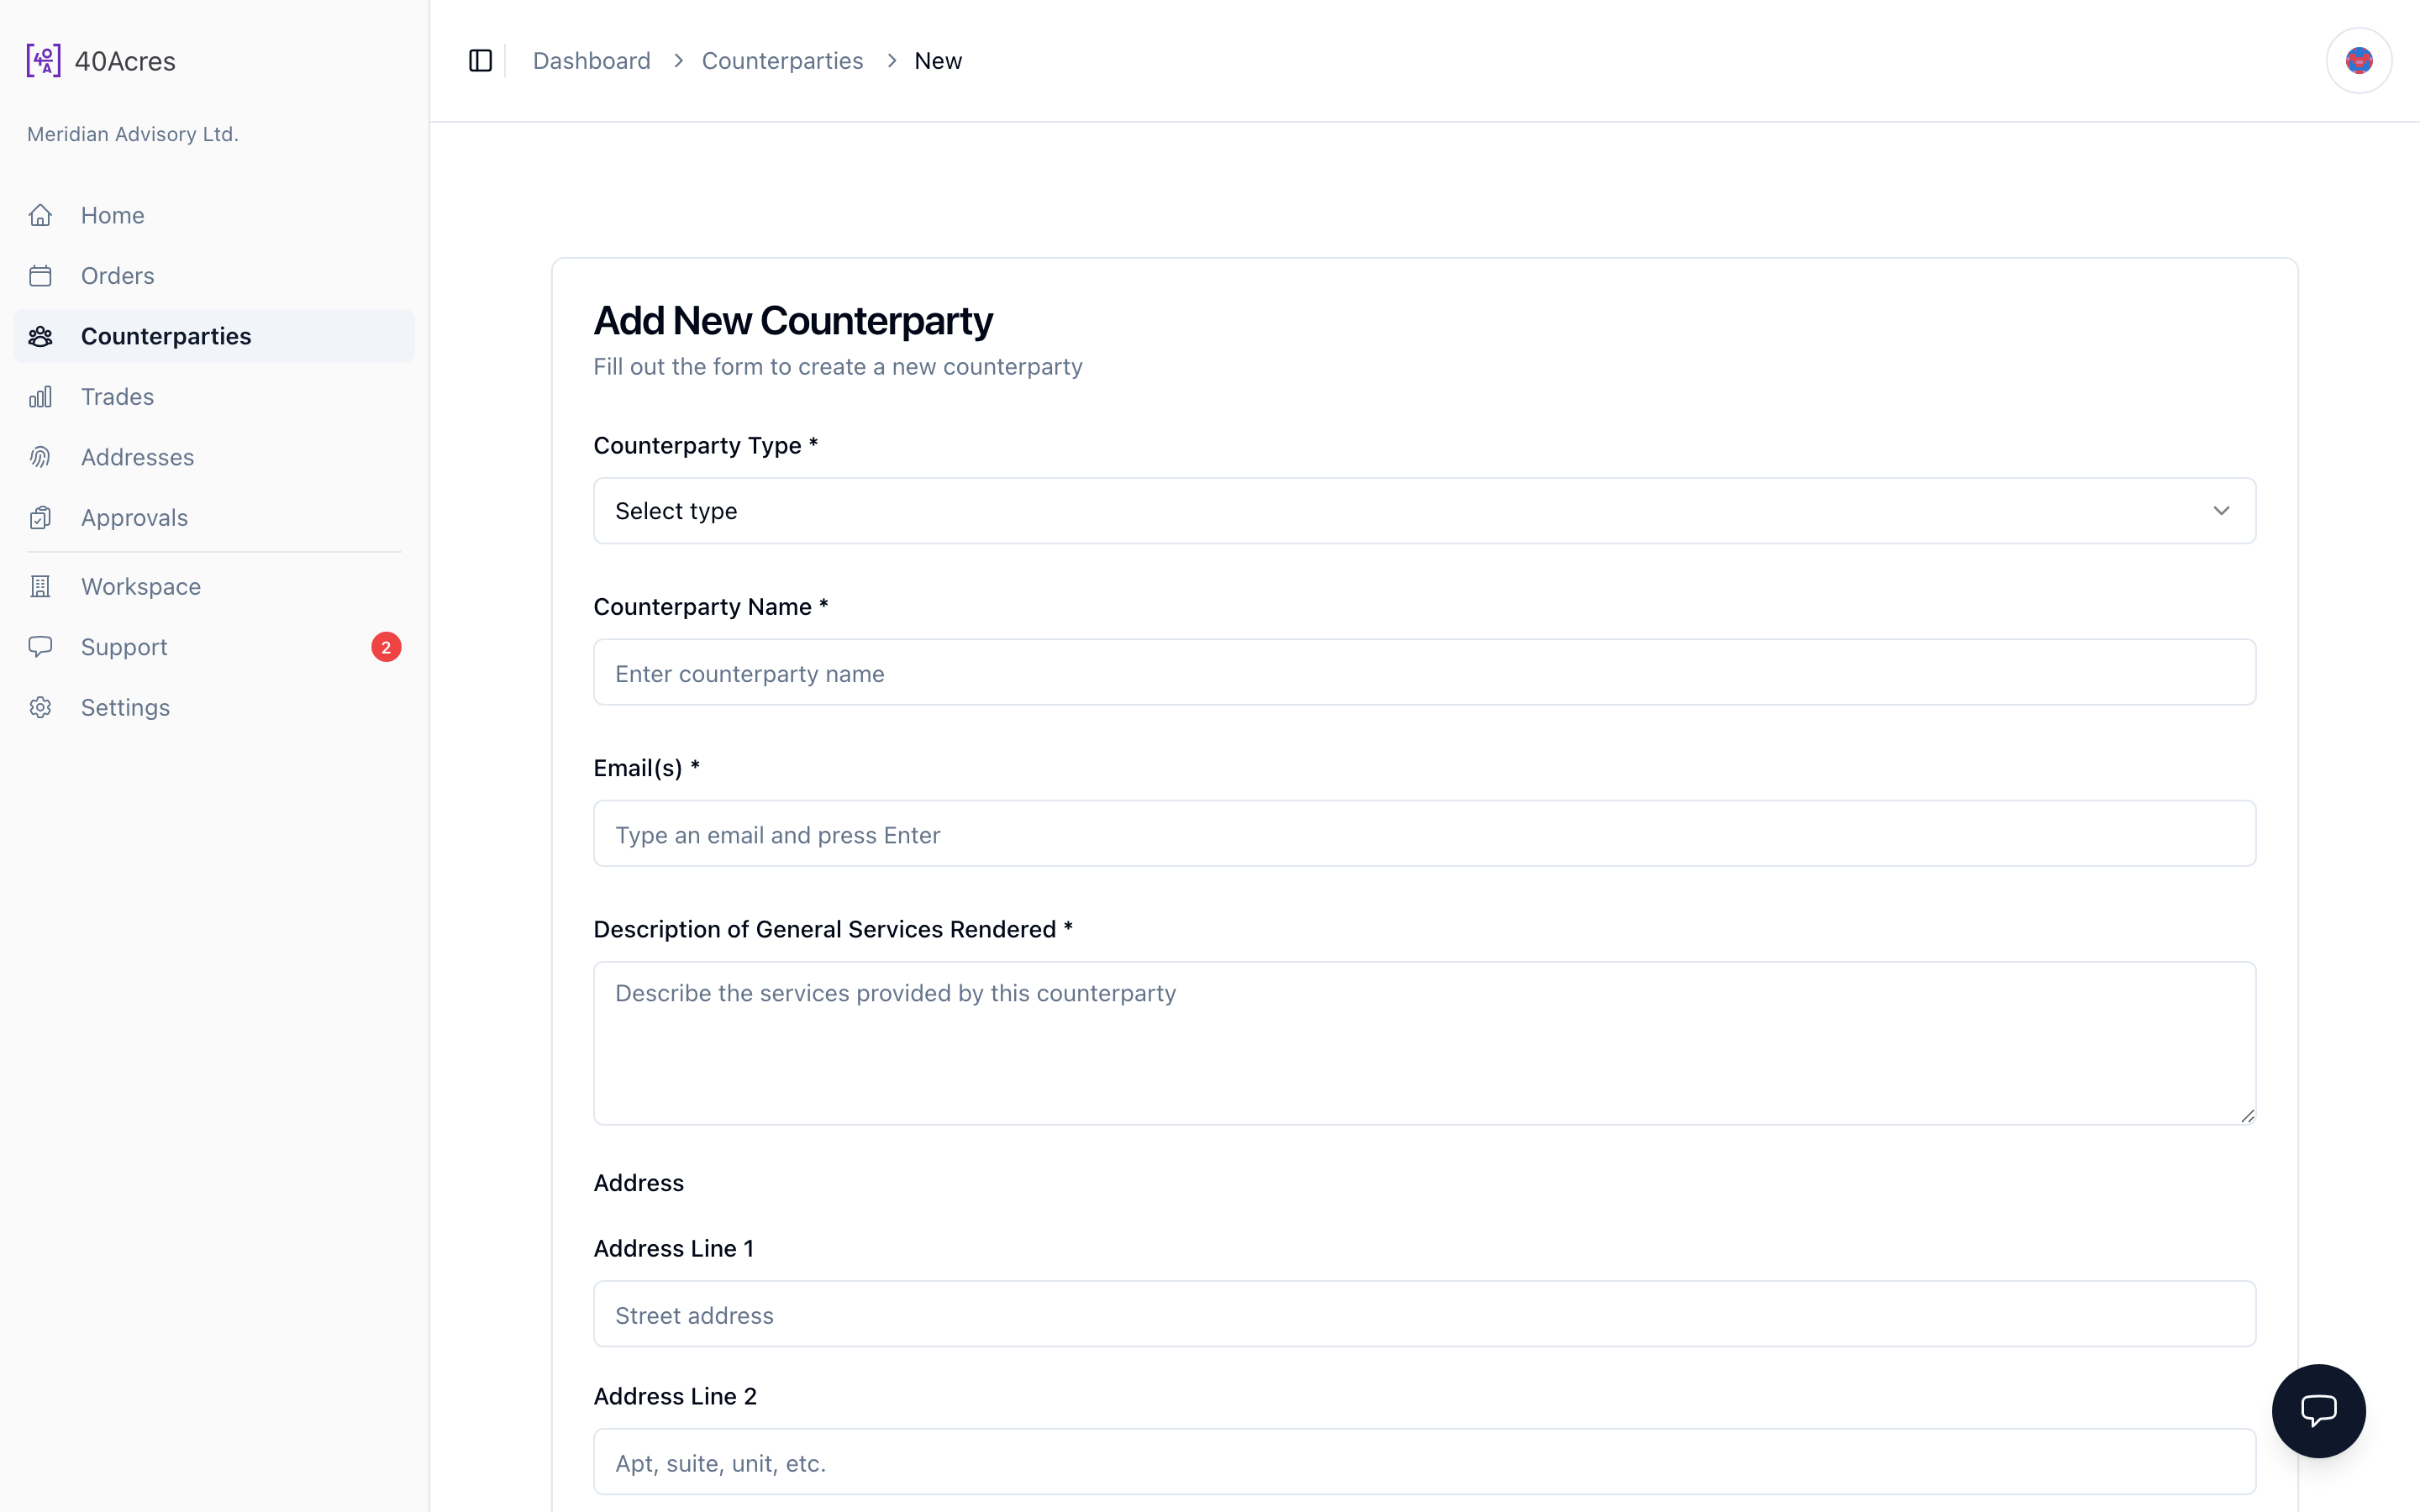
Add a new entity to your book: choose the counterparty type (individual or company), enter its name, one or more contact emails, and a description of the services they render. The address is part of the record: address line 1, city and country are required, while address line 2, state and postal code are optional. Confirm with your two-factor code to save. The name and address are screened by compliance as you save, and again whenever you change them: a clear result marks the counterparty Screened, a hold marks it Under compliance review until compliance decides, and a blocked name is not saved.
- Pick the counterparty type and enter the name exactly as you invoice it
- Add at least one contact email and describe the services rendered
- Enter the address: line 1, city and country are required
- Confirm with your two-factor code
Trades
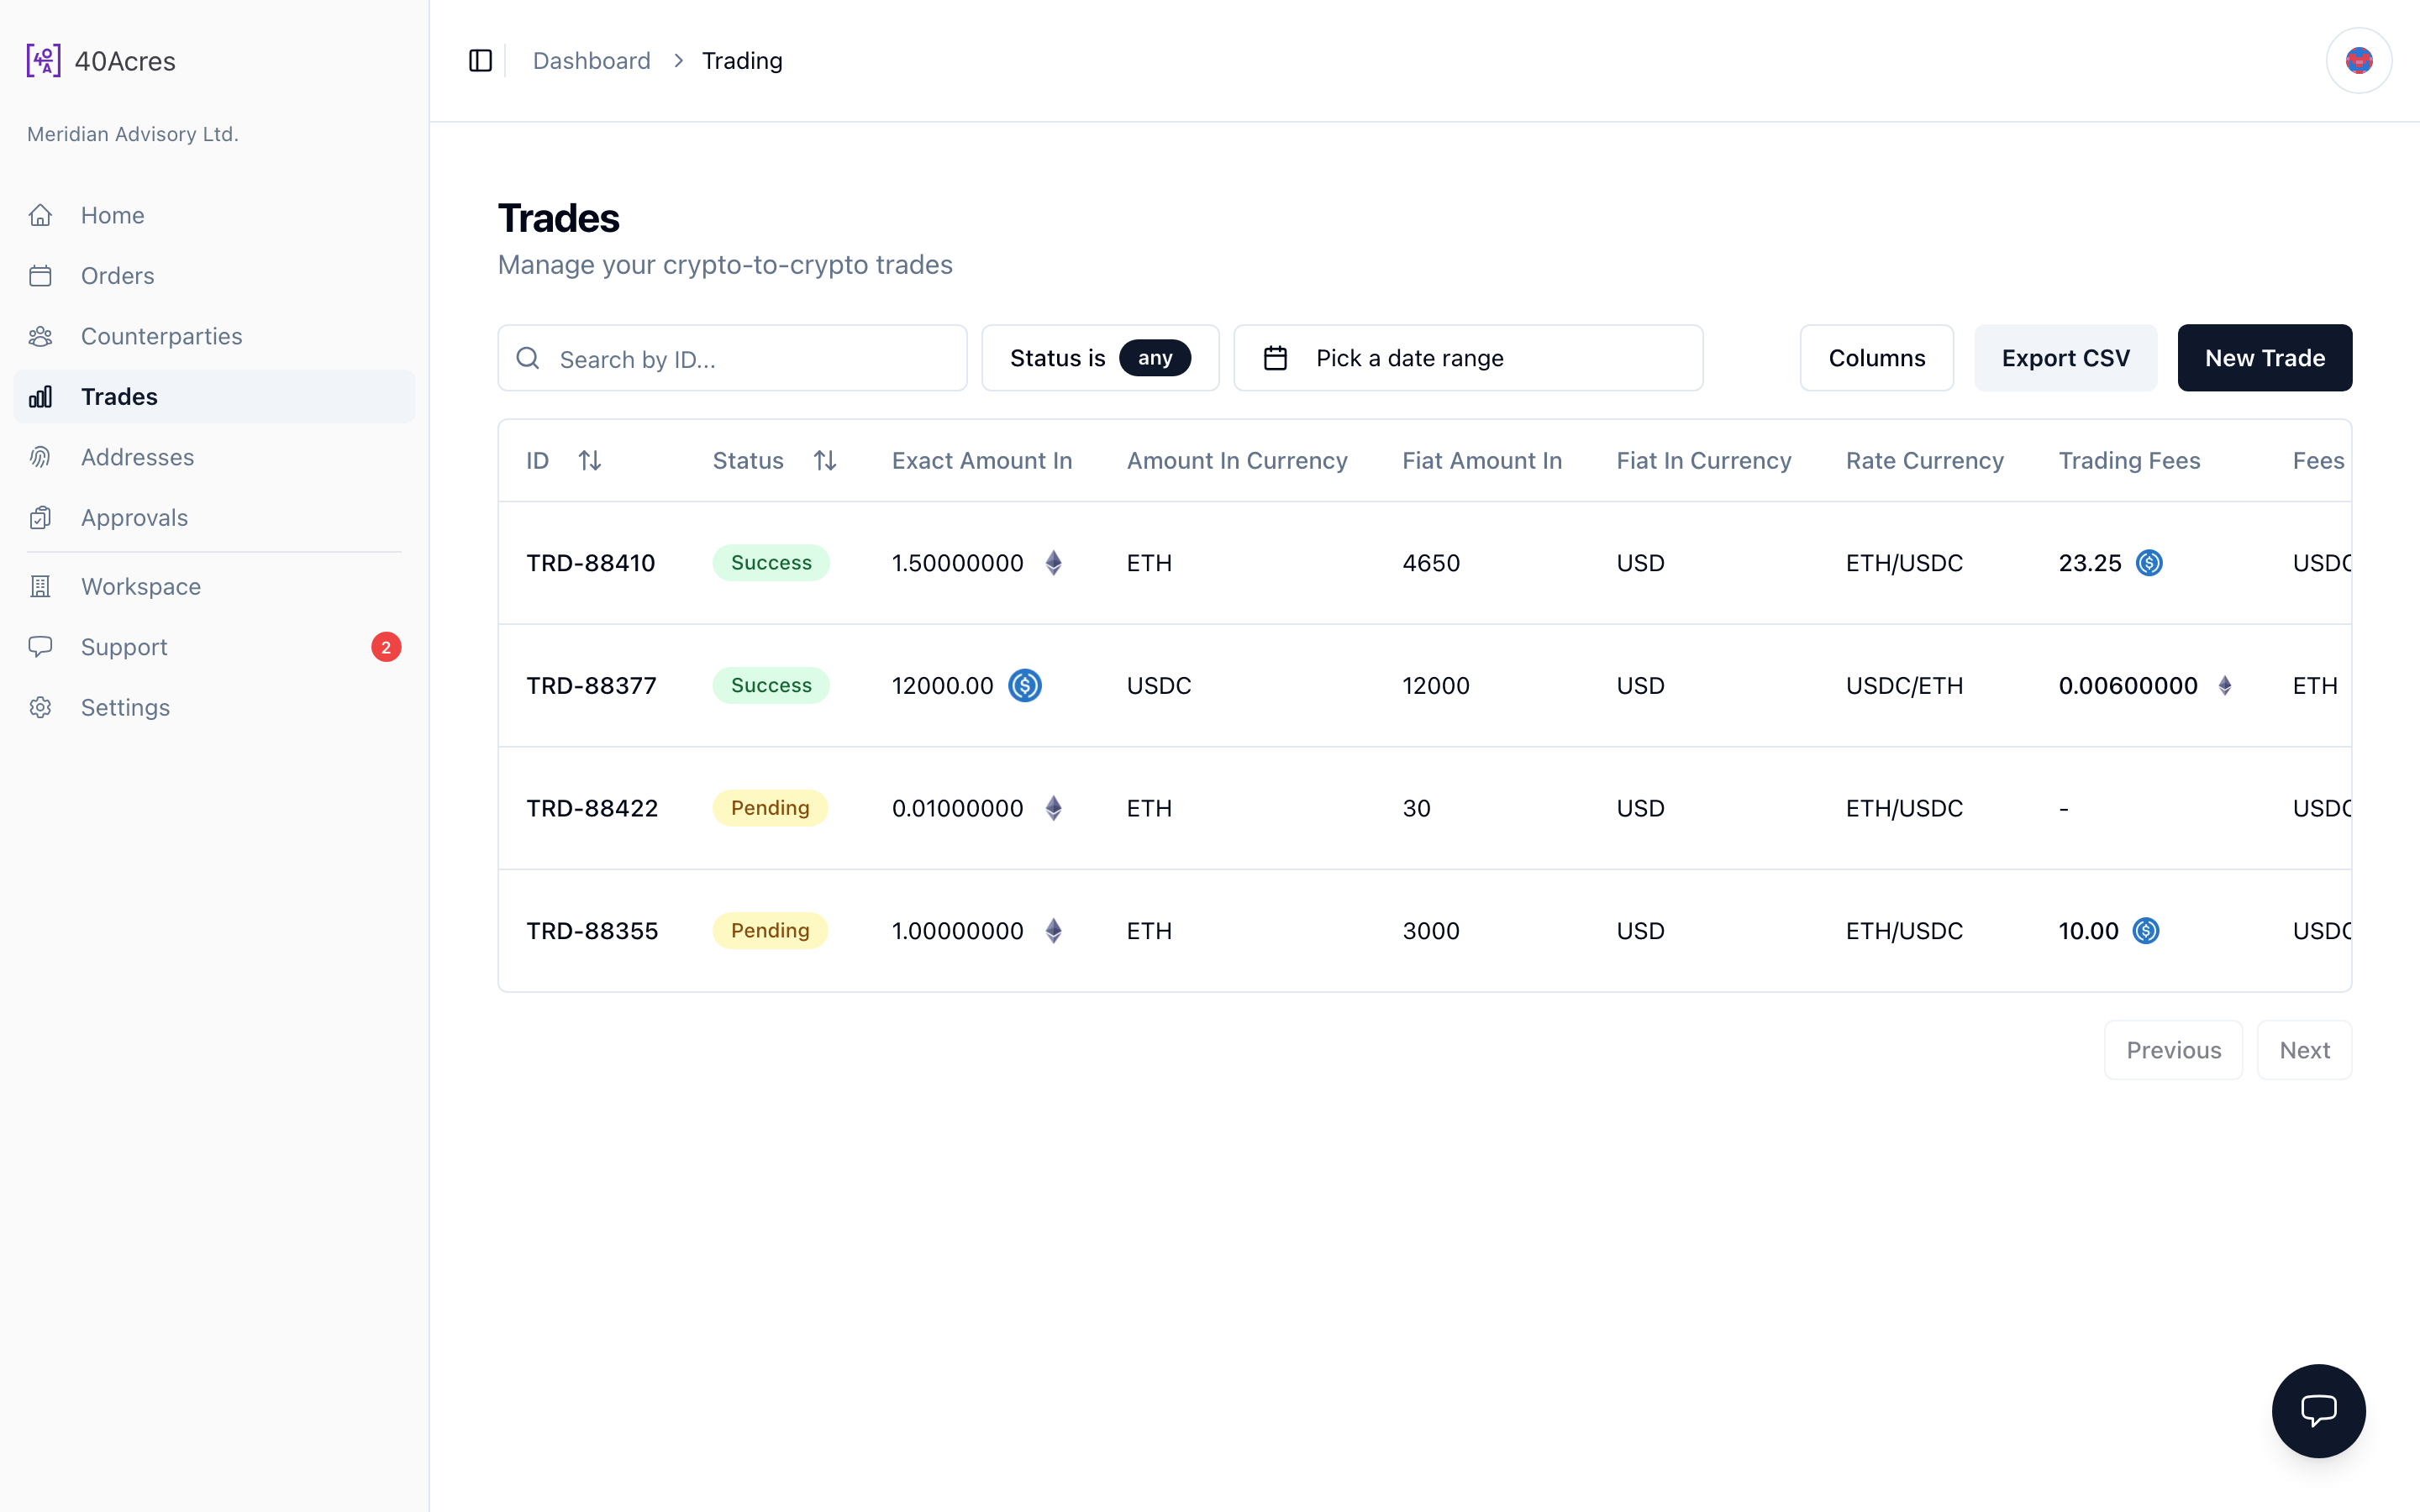
Your OTC trade history: amounts in and out, fees and settlement state, with rates and further detail available from the Columns menu. Trades that still need your deposit sit at the top of the list, newest first, with everything else below. A trade is Pending while your deposit is on its way and Underfunded if the deposit arrived short, moves through processing (Pending Swap, Analysis), then lands on Success; Cancelled, Failed and Expired flag trades that did not complete. A crypto-to-fiat trade shows Awaiting Fiat Settlement after it executes, while the fiat is wired to your bank account, and Funds sent once the payment has been released — arrival after that depends on your bank. This is also where an approved trade waits for you: once a trade passes workspace approval it appears here as Pending — open it with the eye icon to get your deposit instructions and fund it.
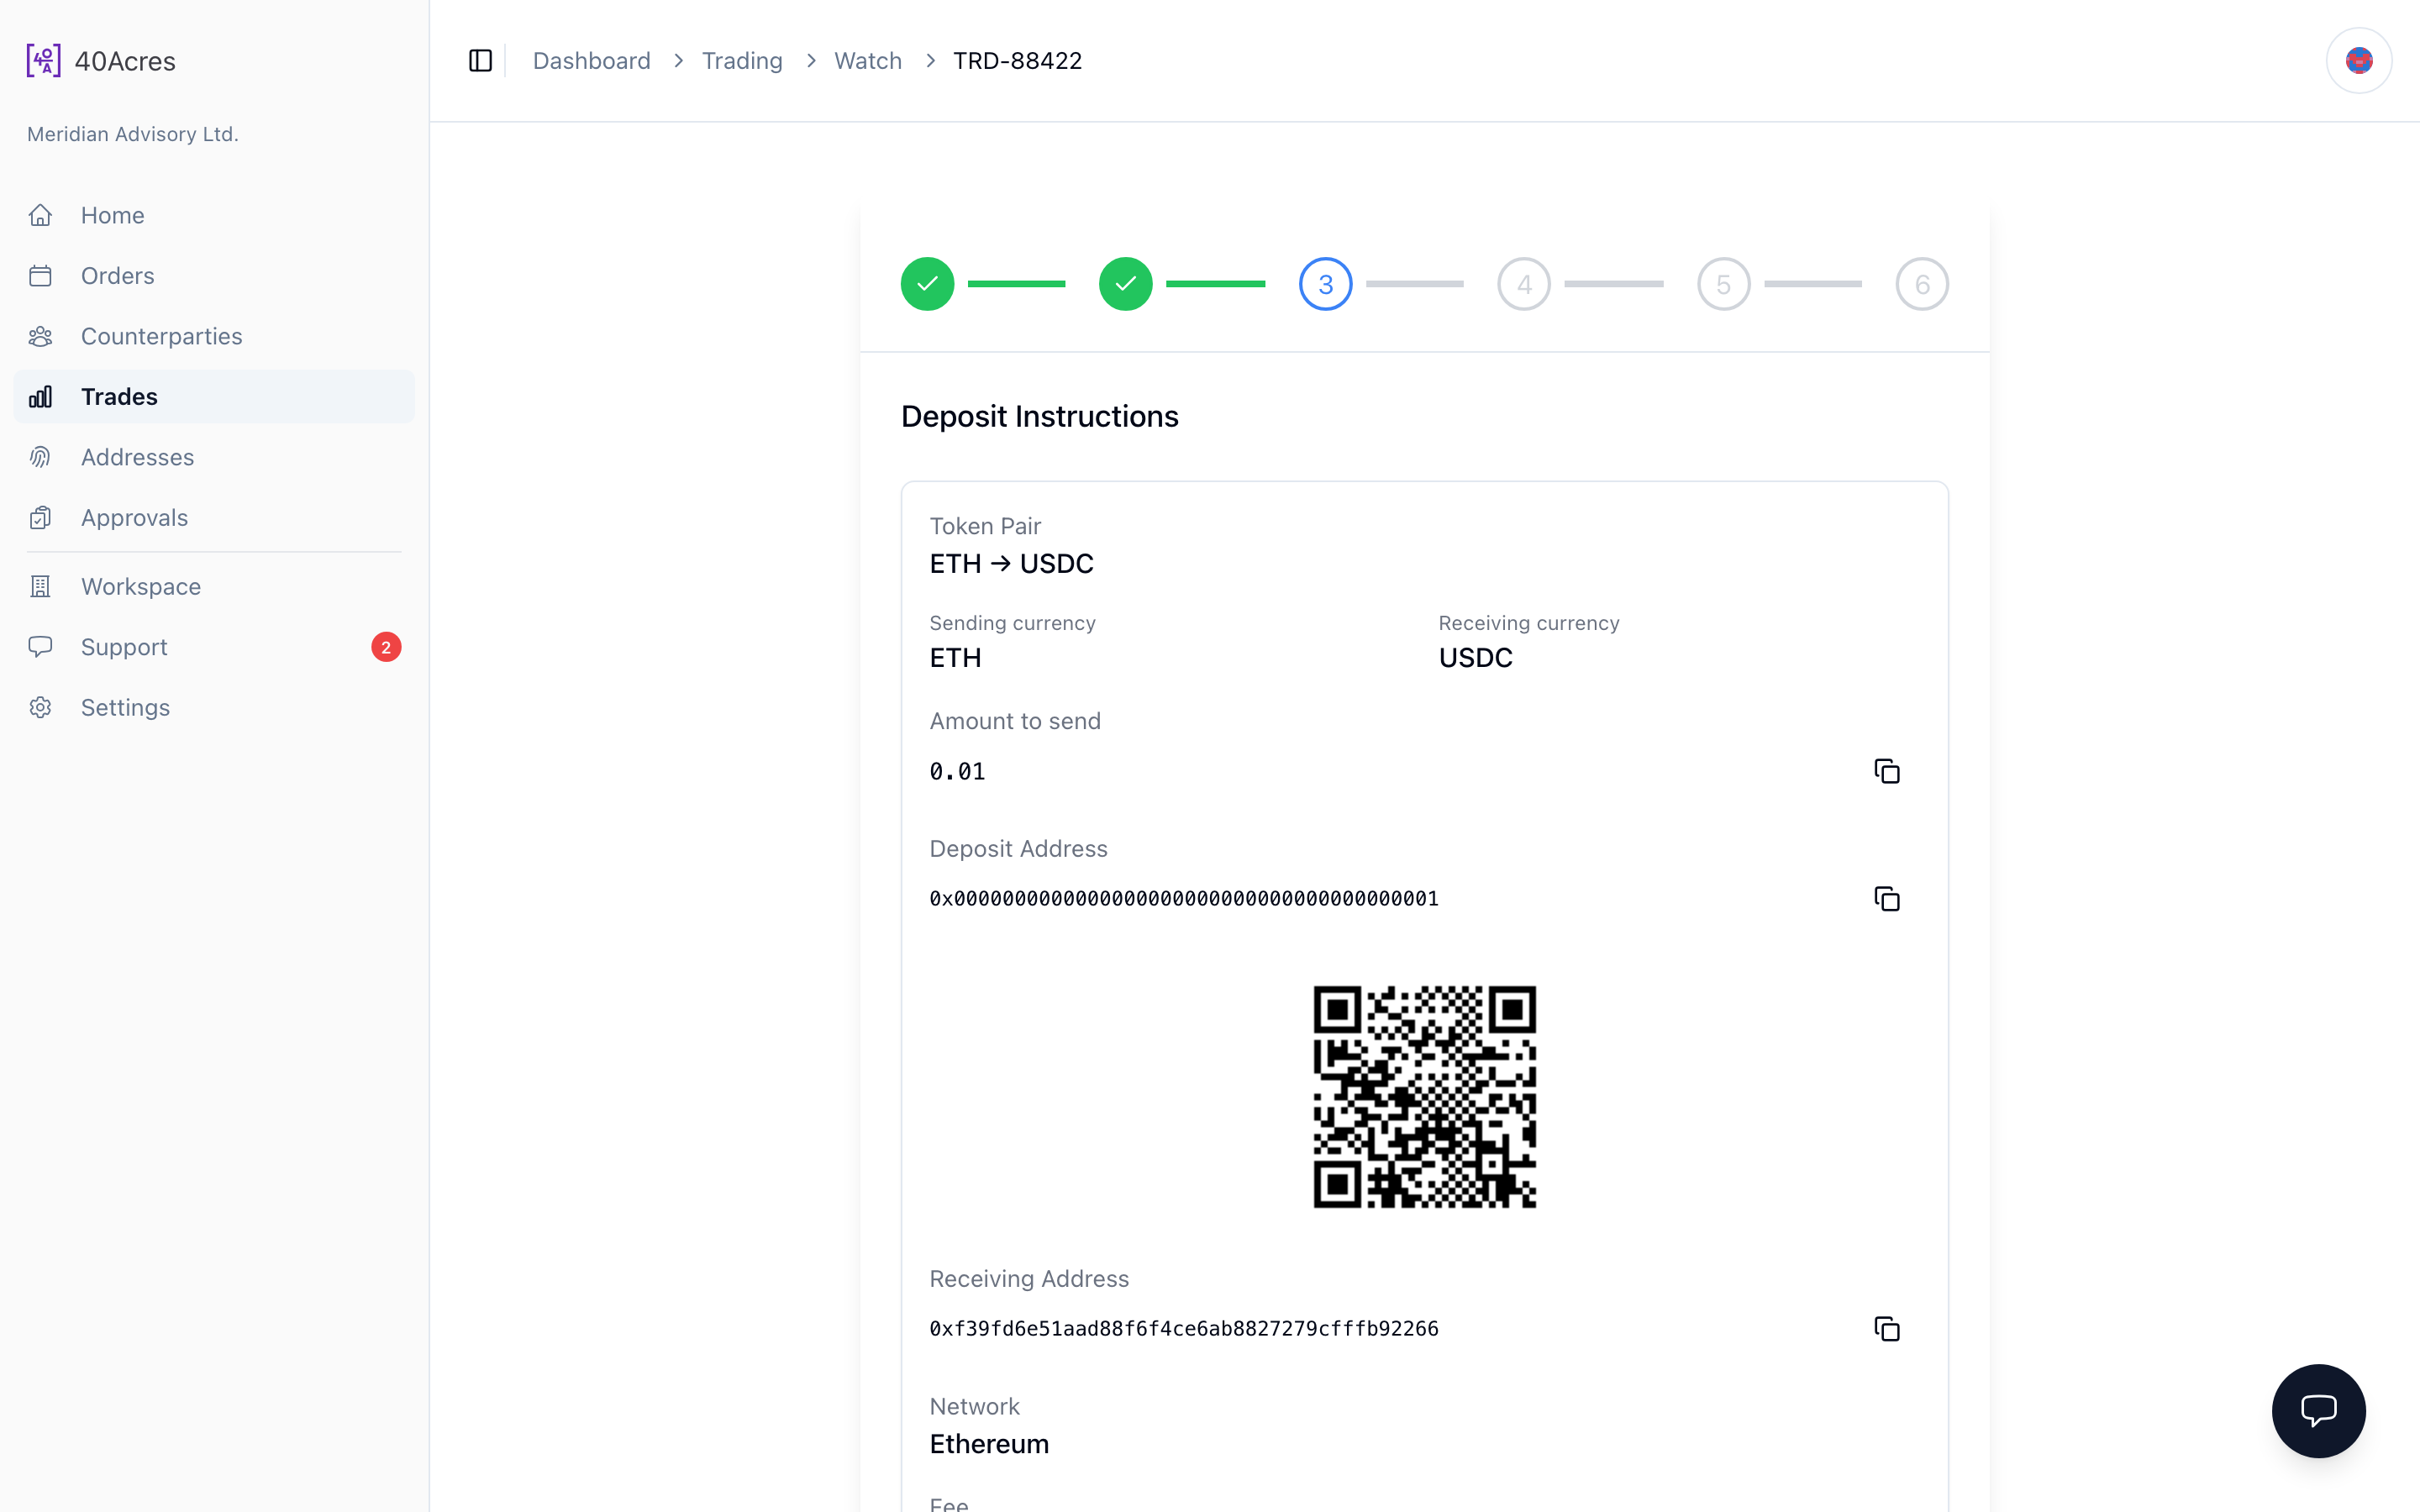
- Open a Pending trade with the eye icon to see its deposit instructions — it cannot execute without your deposit
- An Underfunded trade shows what has arrived and what is still owed — top it up from its deposit instructions
- Search by trade ID; filter by status or date
- Cancel a Pending trade directly from its row
New trade
Set up the trade, get it approved if your workspace requires it, then fund it. Enter the trade details and choose what you receive: another crypto asset, sent to your whitelisted receiving address, or one of the fiat currencies offered on the form, wired to the approved bank account on file for that currency under Addresses › Fiat. You can split the received amount across several whitelisted addresses by percentage. If your workspace requires trade approval, submitting sends the trade to Approvals — once an approver approves it (with their two-factor code), it appears in Trades as Pending, where you open it via the eye icon for deposit instructions. Without approval controls, you confirm with your own two-factor code and the deposit instructions appear immediately. Either way, the trade executes once your funds arrive. Some trades are screened before they can be funded: the form shows Compliance review in progress instead of the deposit instructions, and the deposit address appears as soon as the review clears — you can leave the page and come back, and nothing has been charged. Funding works the same whichever you chose: send the exact amount to the deposit address shown. On a crypto-to-fiat trade the fiat is wired after execution — the trade shows Awaiting Fiat Settlement, then Funds sent once the payment is released — so check your bank details under Addresses › Fiat before your first one. If your deposit arrives short, the trade is held as Underfunded: the deposit instructions show how much has arrived and what is still owed, and you are emailed the outstanding amount with the deadline. Send the remainder to the same address and the trade executes automatically; if the hold expires first, nothing is traded, you are emailed again, and the amount you sent is held for a return that support arranges.
- Enter the trade details and pick what you receive: a whitelisted address for crypto, or a fiat currency paid to the bank account on file
- Check your bank details under Addresses › Fiat before your first crypto-to-fiat trade
- Approval workspaces: submit for approval, then open the approved trade from Trades via the eye icon
- Send the deposit exactly as instructed by the platform
- If the trade is held as Underfunded, send the outstanding amount shown before the deadline
Addresses › Fiat (bank details)
The bank accounts your fiat settlements are wired to, under the Fiat tab of Addresses. Add wire details for each fiat currency you want to receive: pick the holder type, the rail or account type and the account currency first — the account fields then follow the rail you chose, with a bank country and a free-text box for additional beneficiary information such as a sort code or intermediary bank. Changes require compliance approval: a new entry shows Pending approval, then Active, or Rejected with the reason. Only one entry can be active per currency, and settlements in that currency are paid to its active account; you can deactivate, reactivate or remove entries and view their history from the same page. That includes crypto-to-fiat trades, so check these details before your first one.
- Add wire details for each currency you expect to be settled in, choosing the rail first — the fields follow the rail
- Wait for compliance approval: only an approved entry can be active
- Keep one active entry per currency and remove accounts you no longer use
Addresses › Crypto (whitelist)
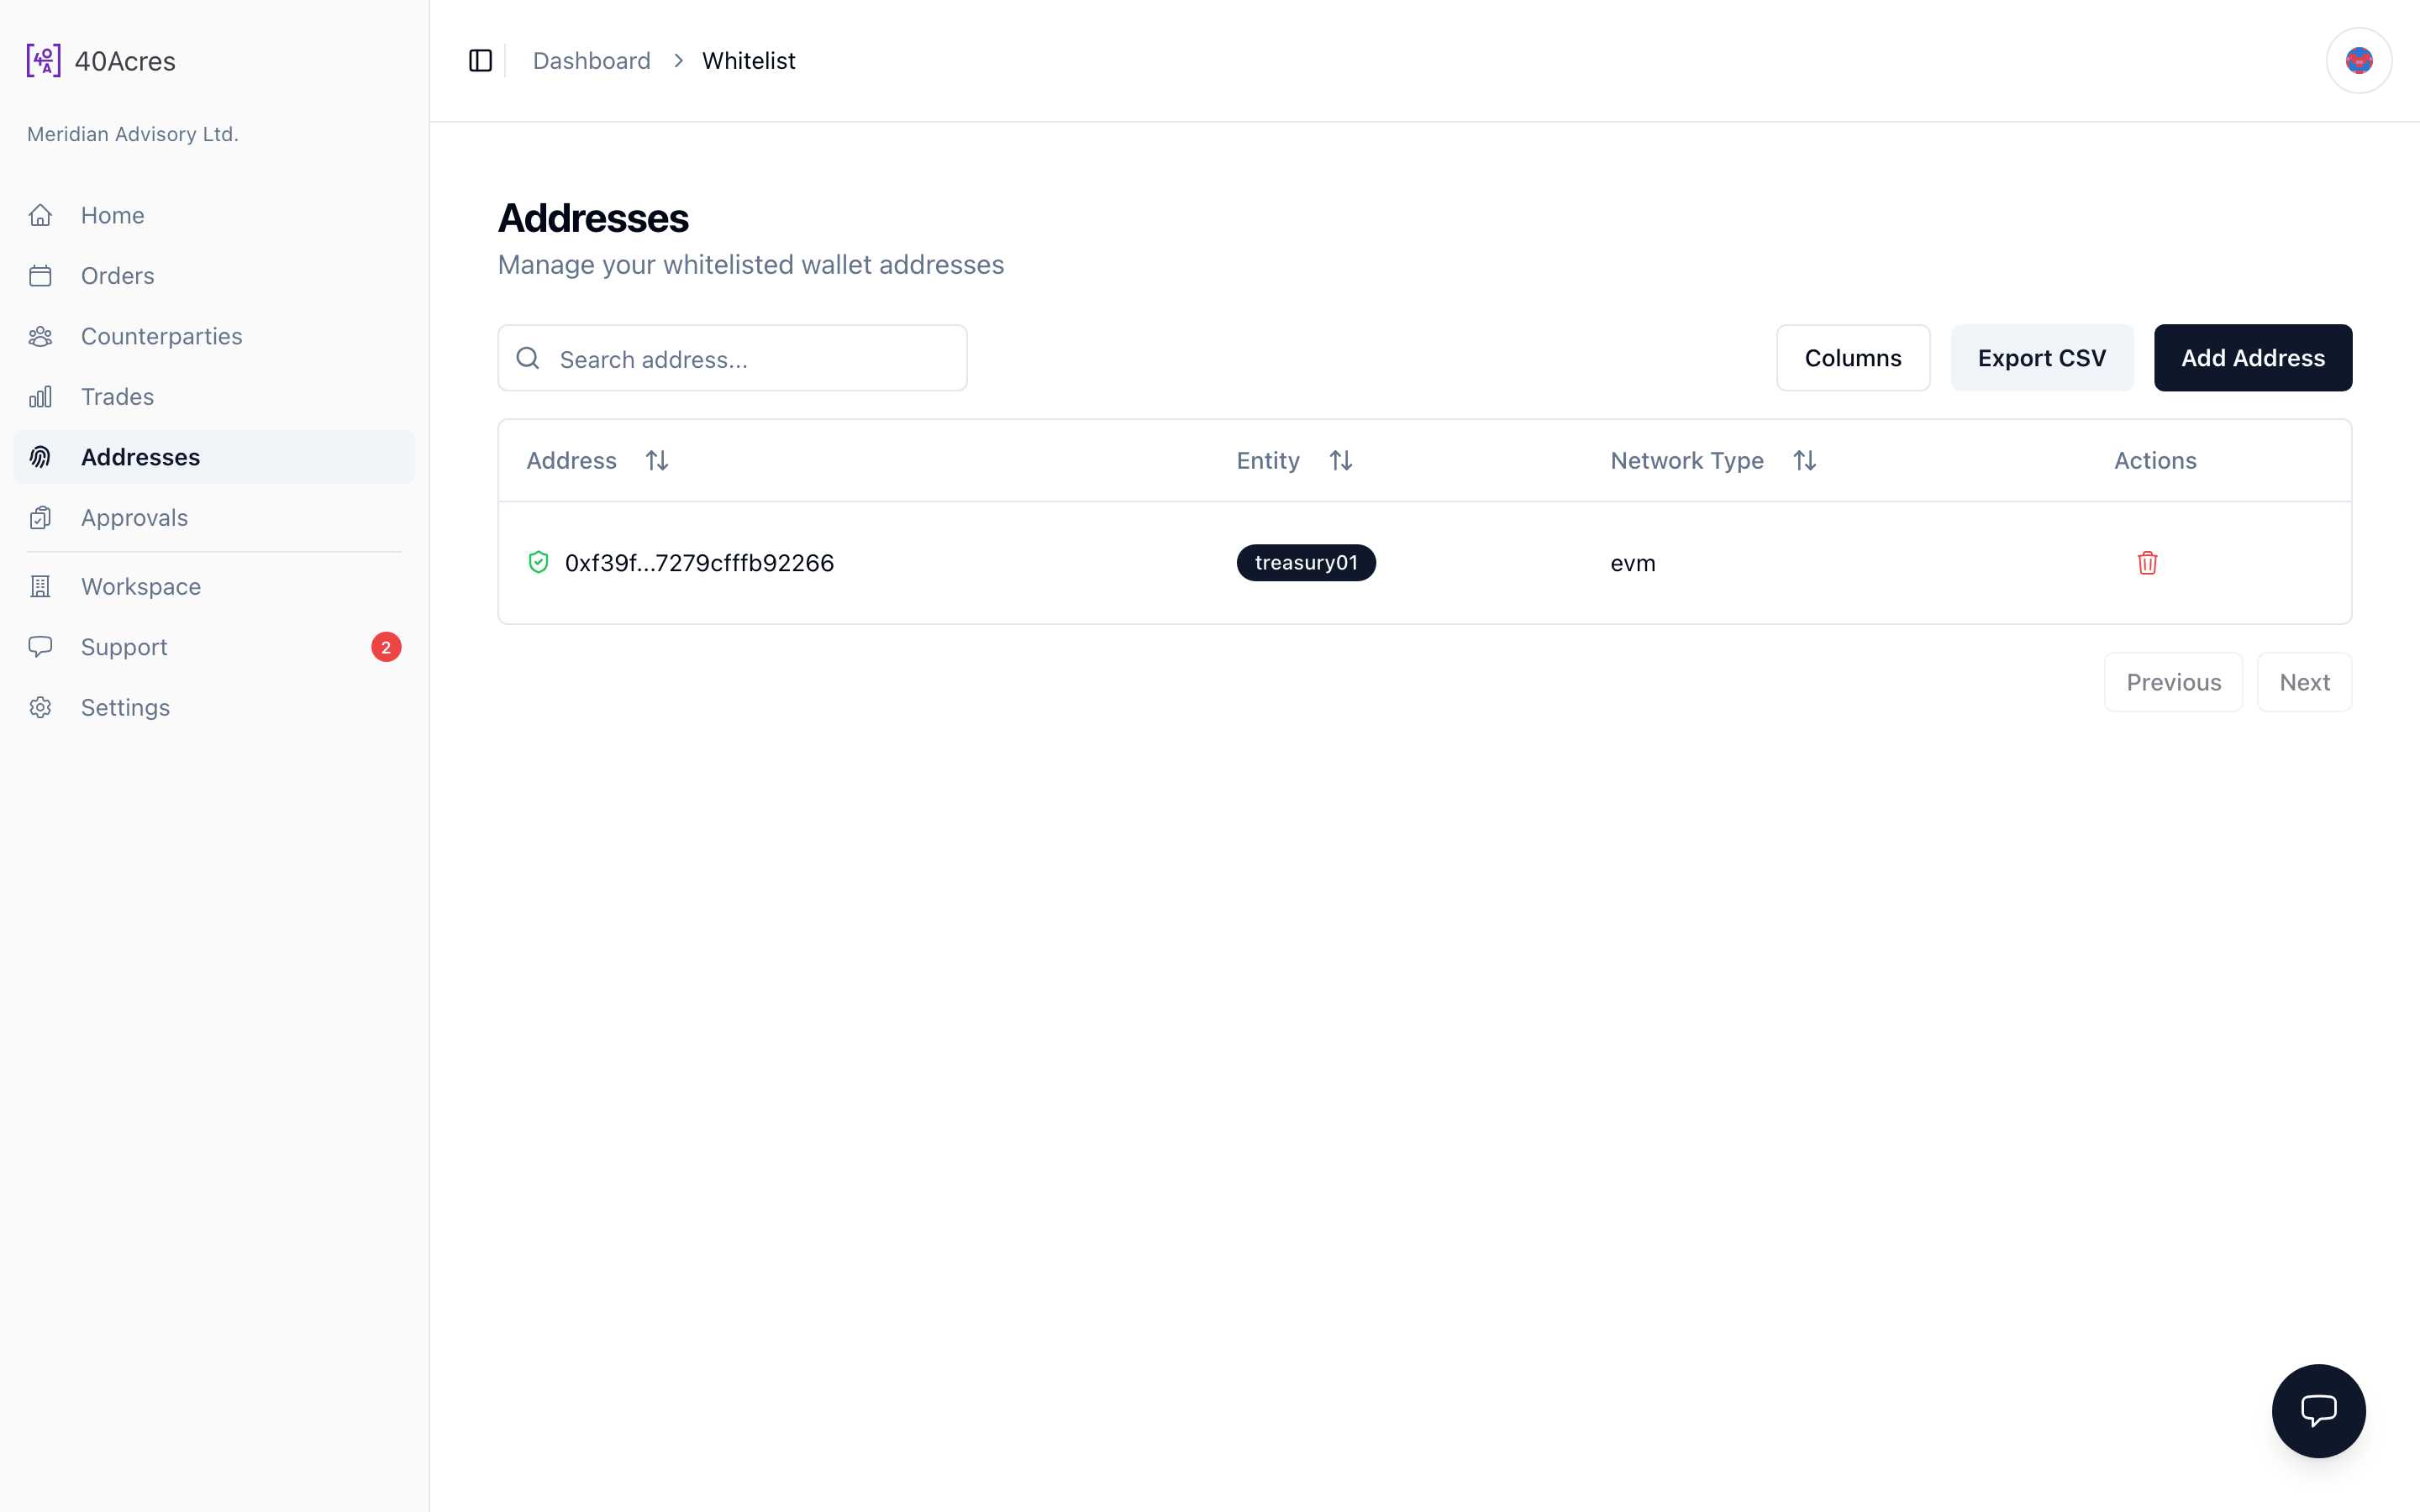
The whitelist of receiving addresses used for trading and crypto-to-crypto settlement, under the Crypto tab of Addresses. Submitted addresses are screened after you confirm ownership and pass two-factor confirmation; a green shield marks addresses that passed screening, and only those can be selected on a trade. Addresses opens on two cards, Fiat for bank details and Crypto for this whitelist, when both are available to you; otherwise it opens the one you can reach. Depending on your workspace permissions, adding addresses may be limited to specific team members, and workspaces can require approval before a new address is released — a submission awaiting approval is tracked under Approvals, not here.
- Check an address shows the validated shield before starting a trade
- Keep labels meaningful: treasury01, not wallet3
- Remove addresses that are no longer in use
Add address
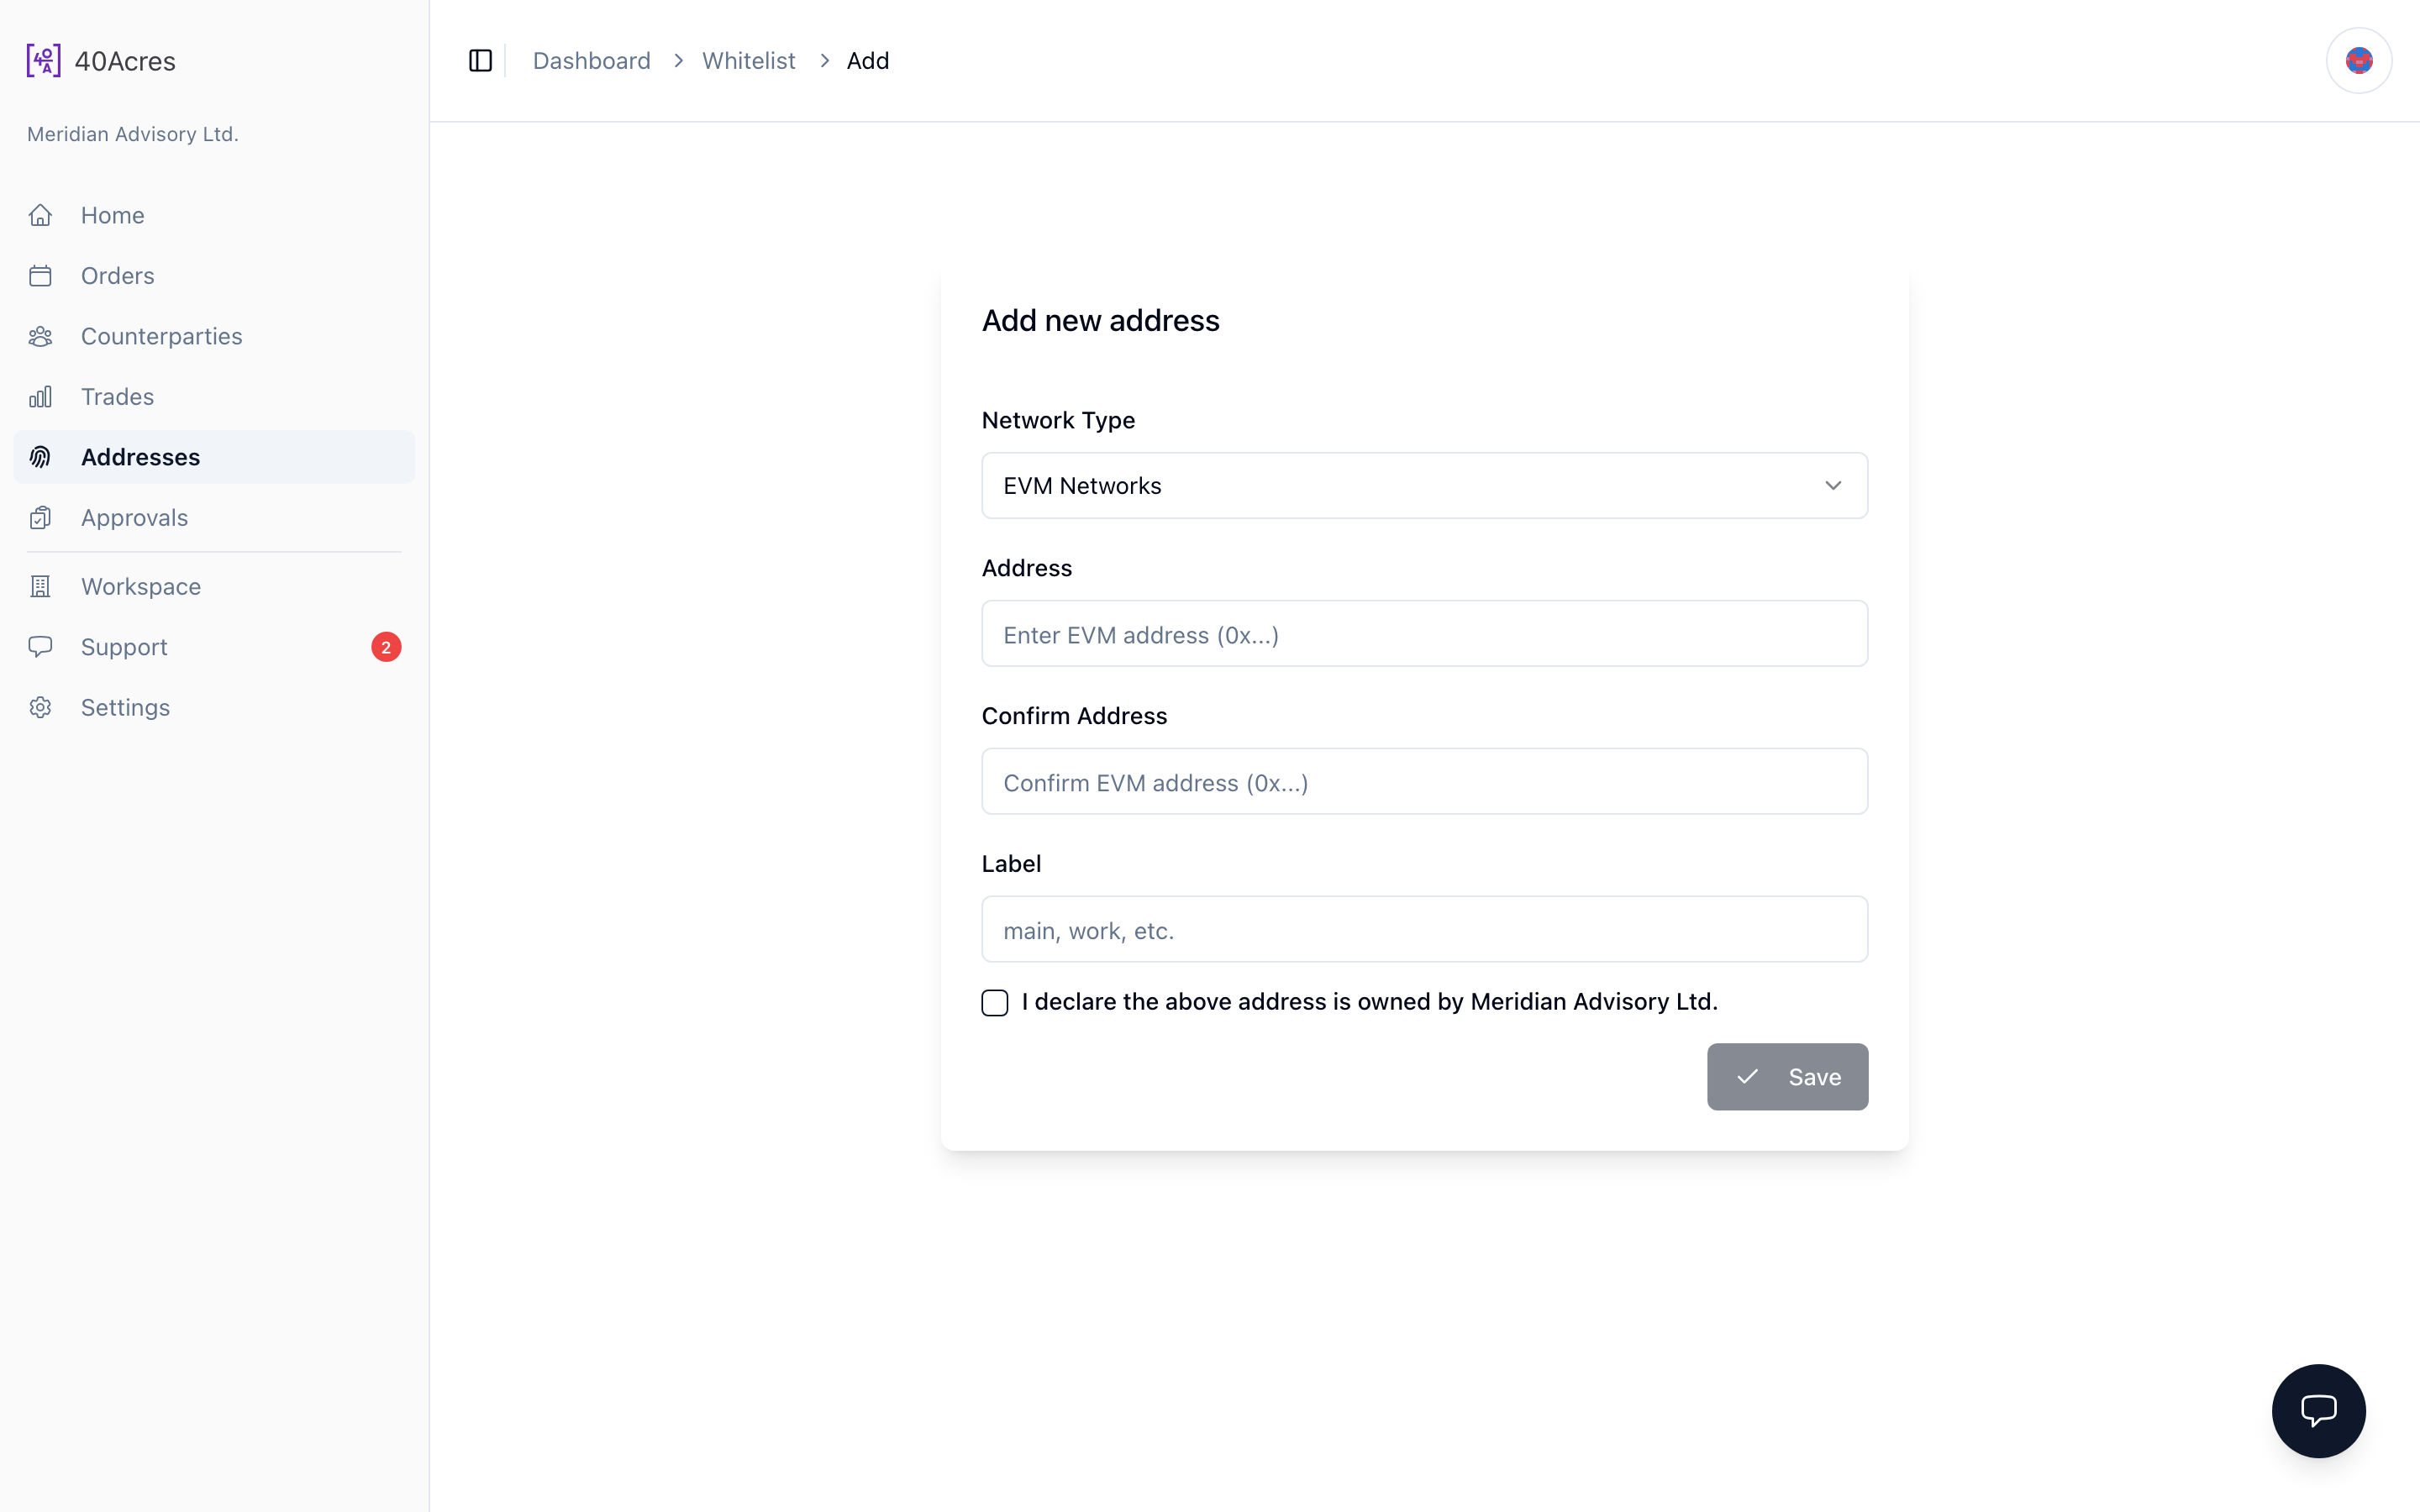
Submit a new address from the Crypto tab of Addresses: choose the network type, enter the address and re-type it to confirm, add a short label, tick the box confirming you own the address, then confirm with your two-factor code. Screening runs automatically. If your workspace requires whitelist approval, the button reads Submit for approval and the submission waits in Approvals — an approver releases it with their own two-factor code, and only then does it join the whitelist. Otherwise the address becomes available for trading as soon as screening passes.
- Paste the exact address into both fields — the form asks you to confirm it
- Pick the network type and a short label, confirm ownership, then complete two-factor confirmation
- Screening runs automatically; in approval workspaces the address activates once an approver releases it
Approvals
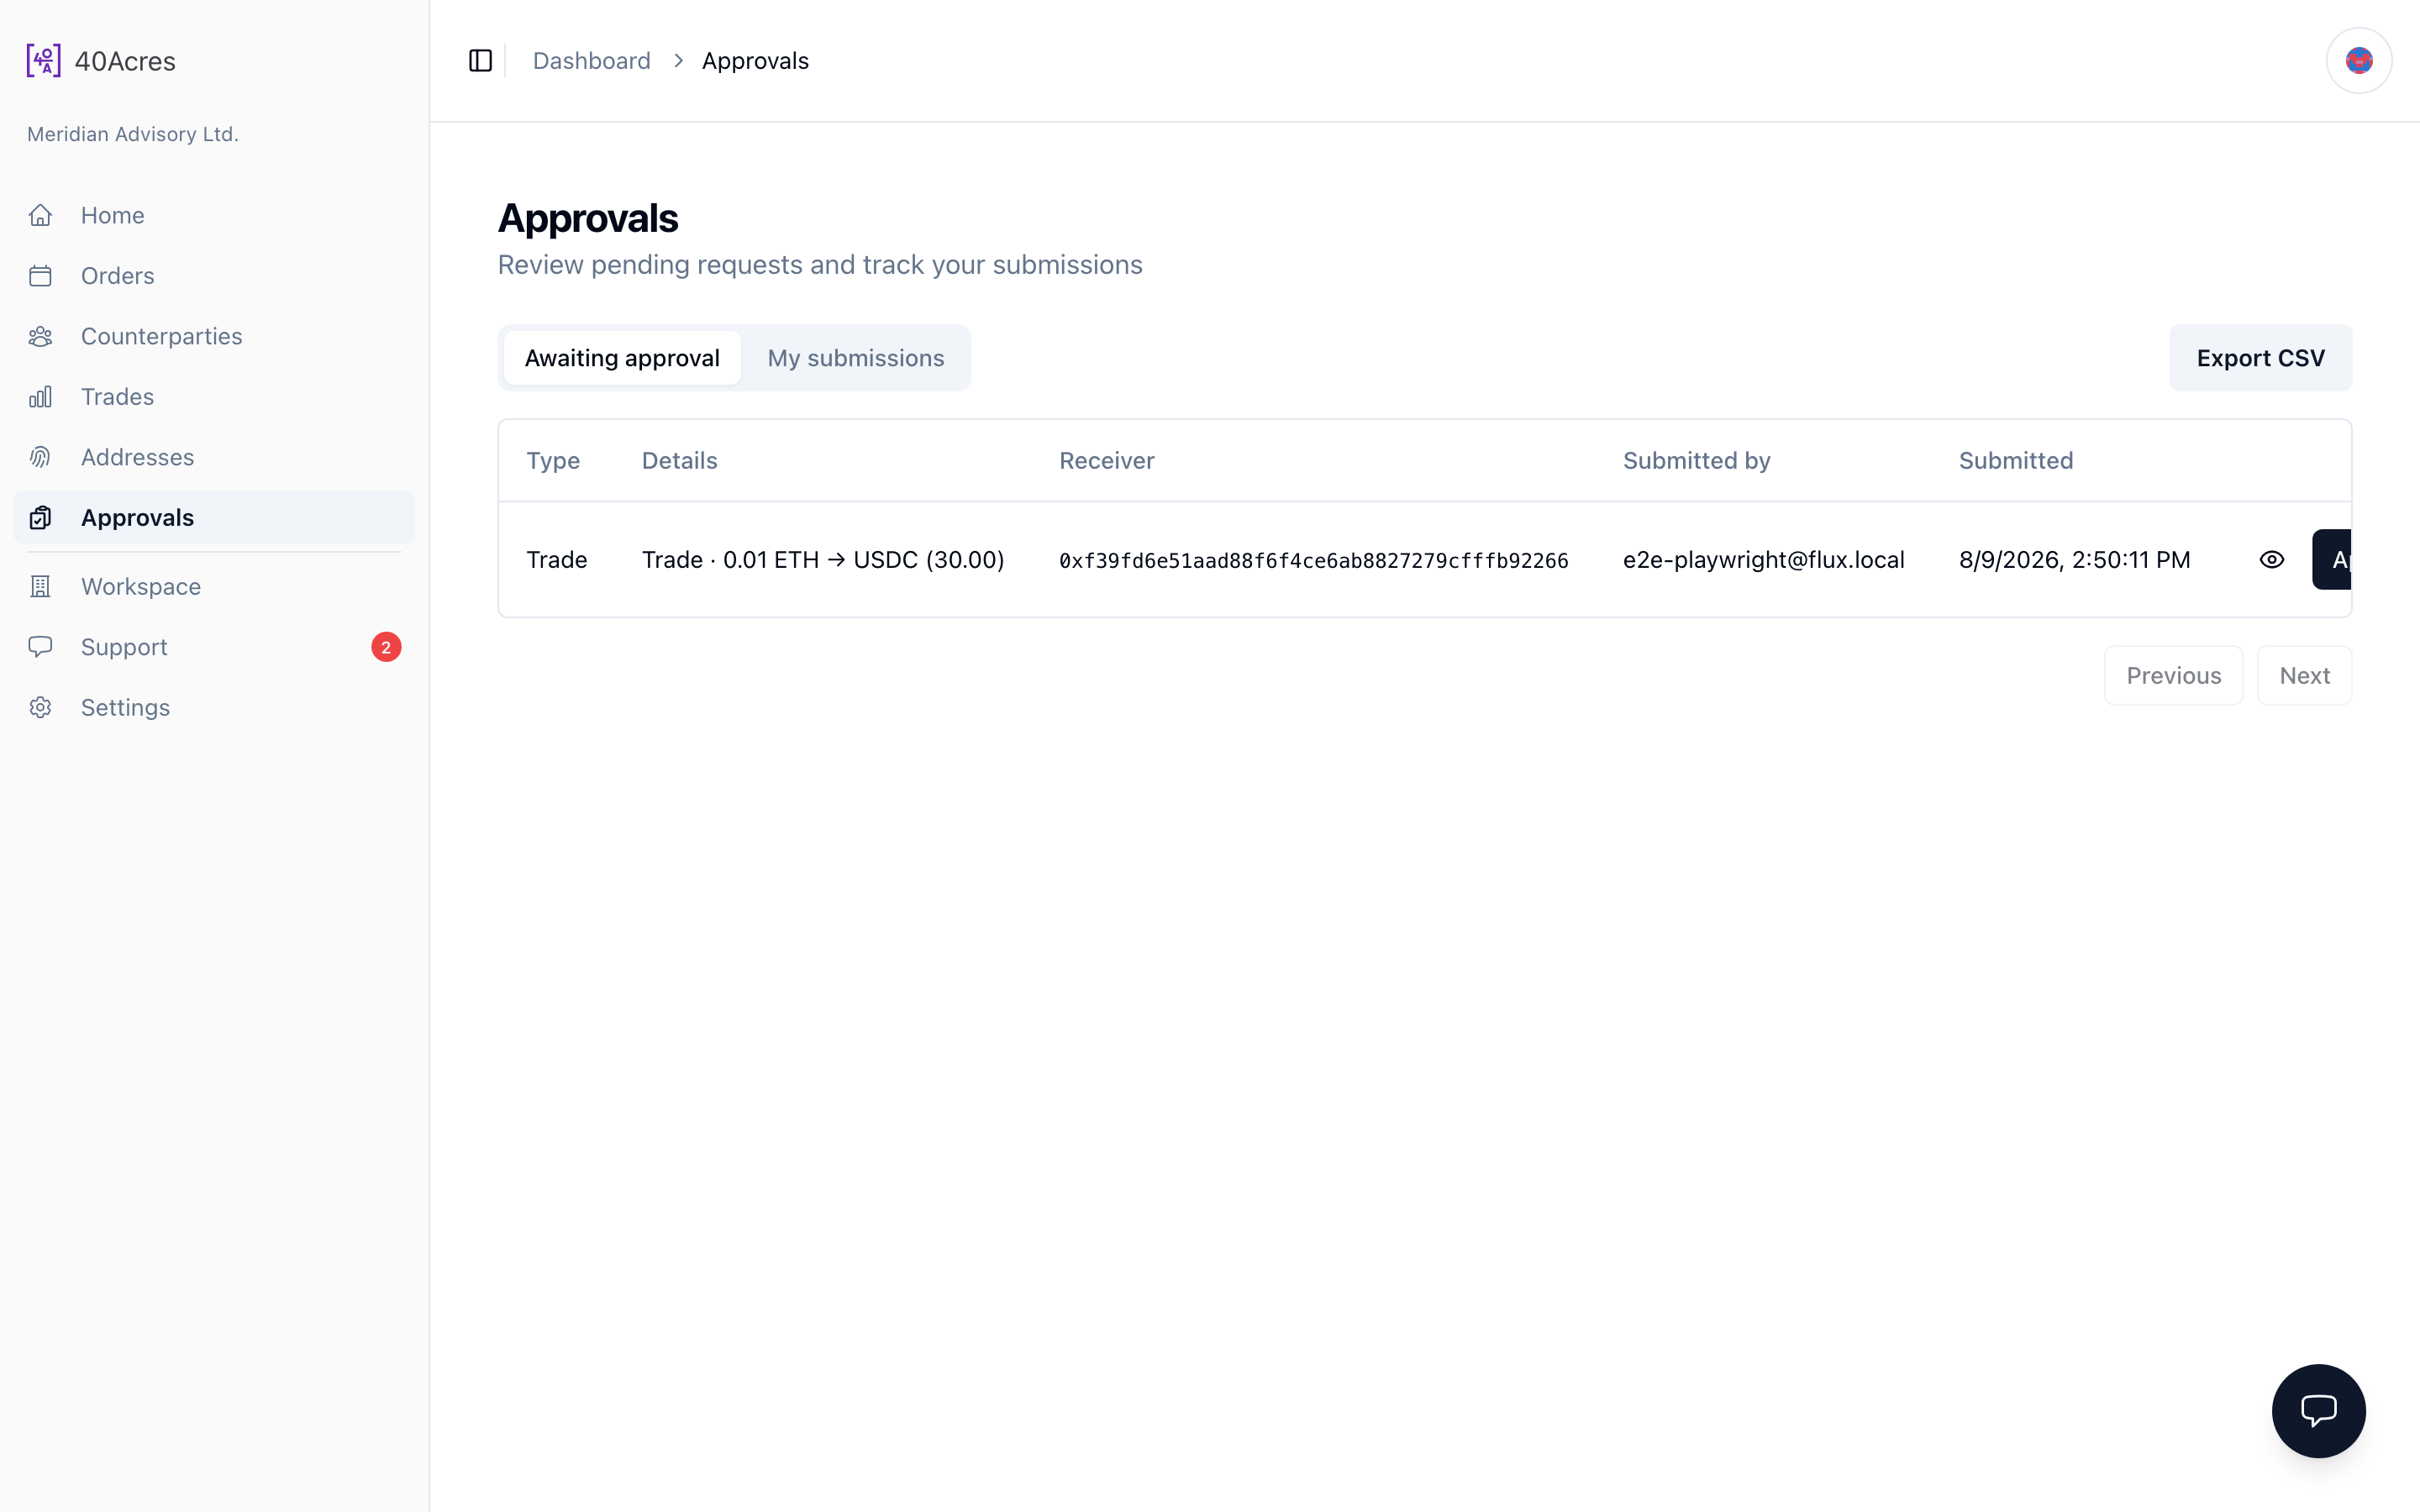
The sign-off queue for workspaces with approval controls. Orders, trades and whitelist additions can each be set to require sign-off in your workspace settings, and those requests land here. Approvers see an Awaiting approval tab for the kinds they hold the matching permission for; everyone sees My submissions, which tracks their own requests with status, and the reason if rejected. You cannot approve your own request unless the workspace allows self-approval. Approving executes the action on the spot — trades and whitelist additions ask the approver for their two-factor code first. If a request is stuck because nobody in the workspace can approve it, the 40 Acres team can release it: it then shows as Cancelled under My submissions with the reason they gave, and you can submit it again once an approver is in place.
- Review the full detail before approving — approval executes the action immediately
- Reject with a reason; the requester sees it under My submissions and can submit a fresh request
- Track your own pending requests under My submissions, and cancel one while it is still pending
Workspace: members and permissions
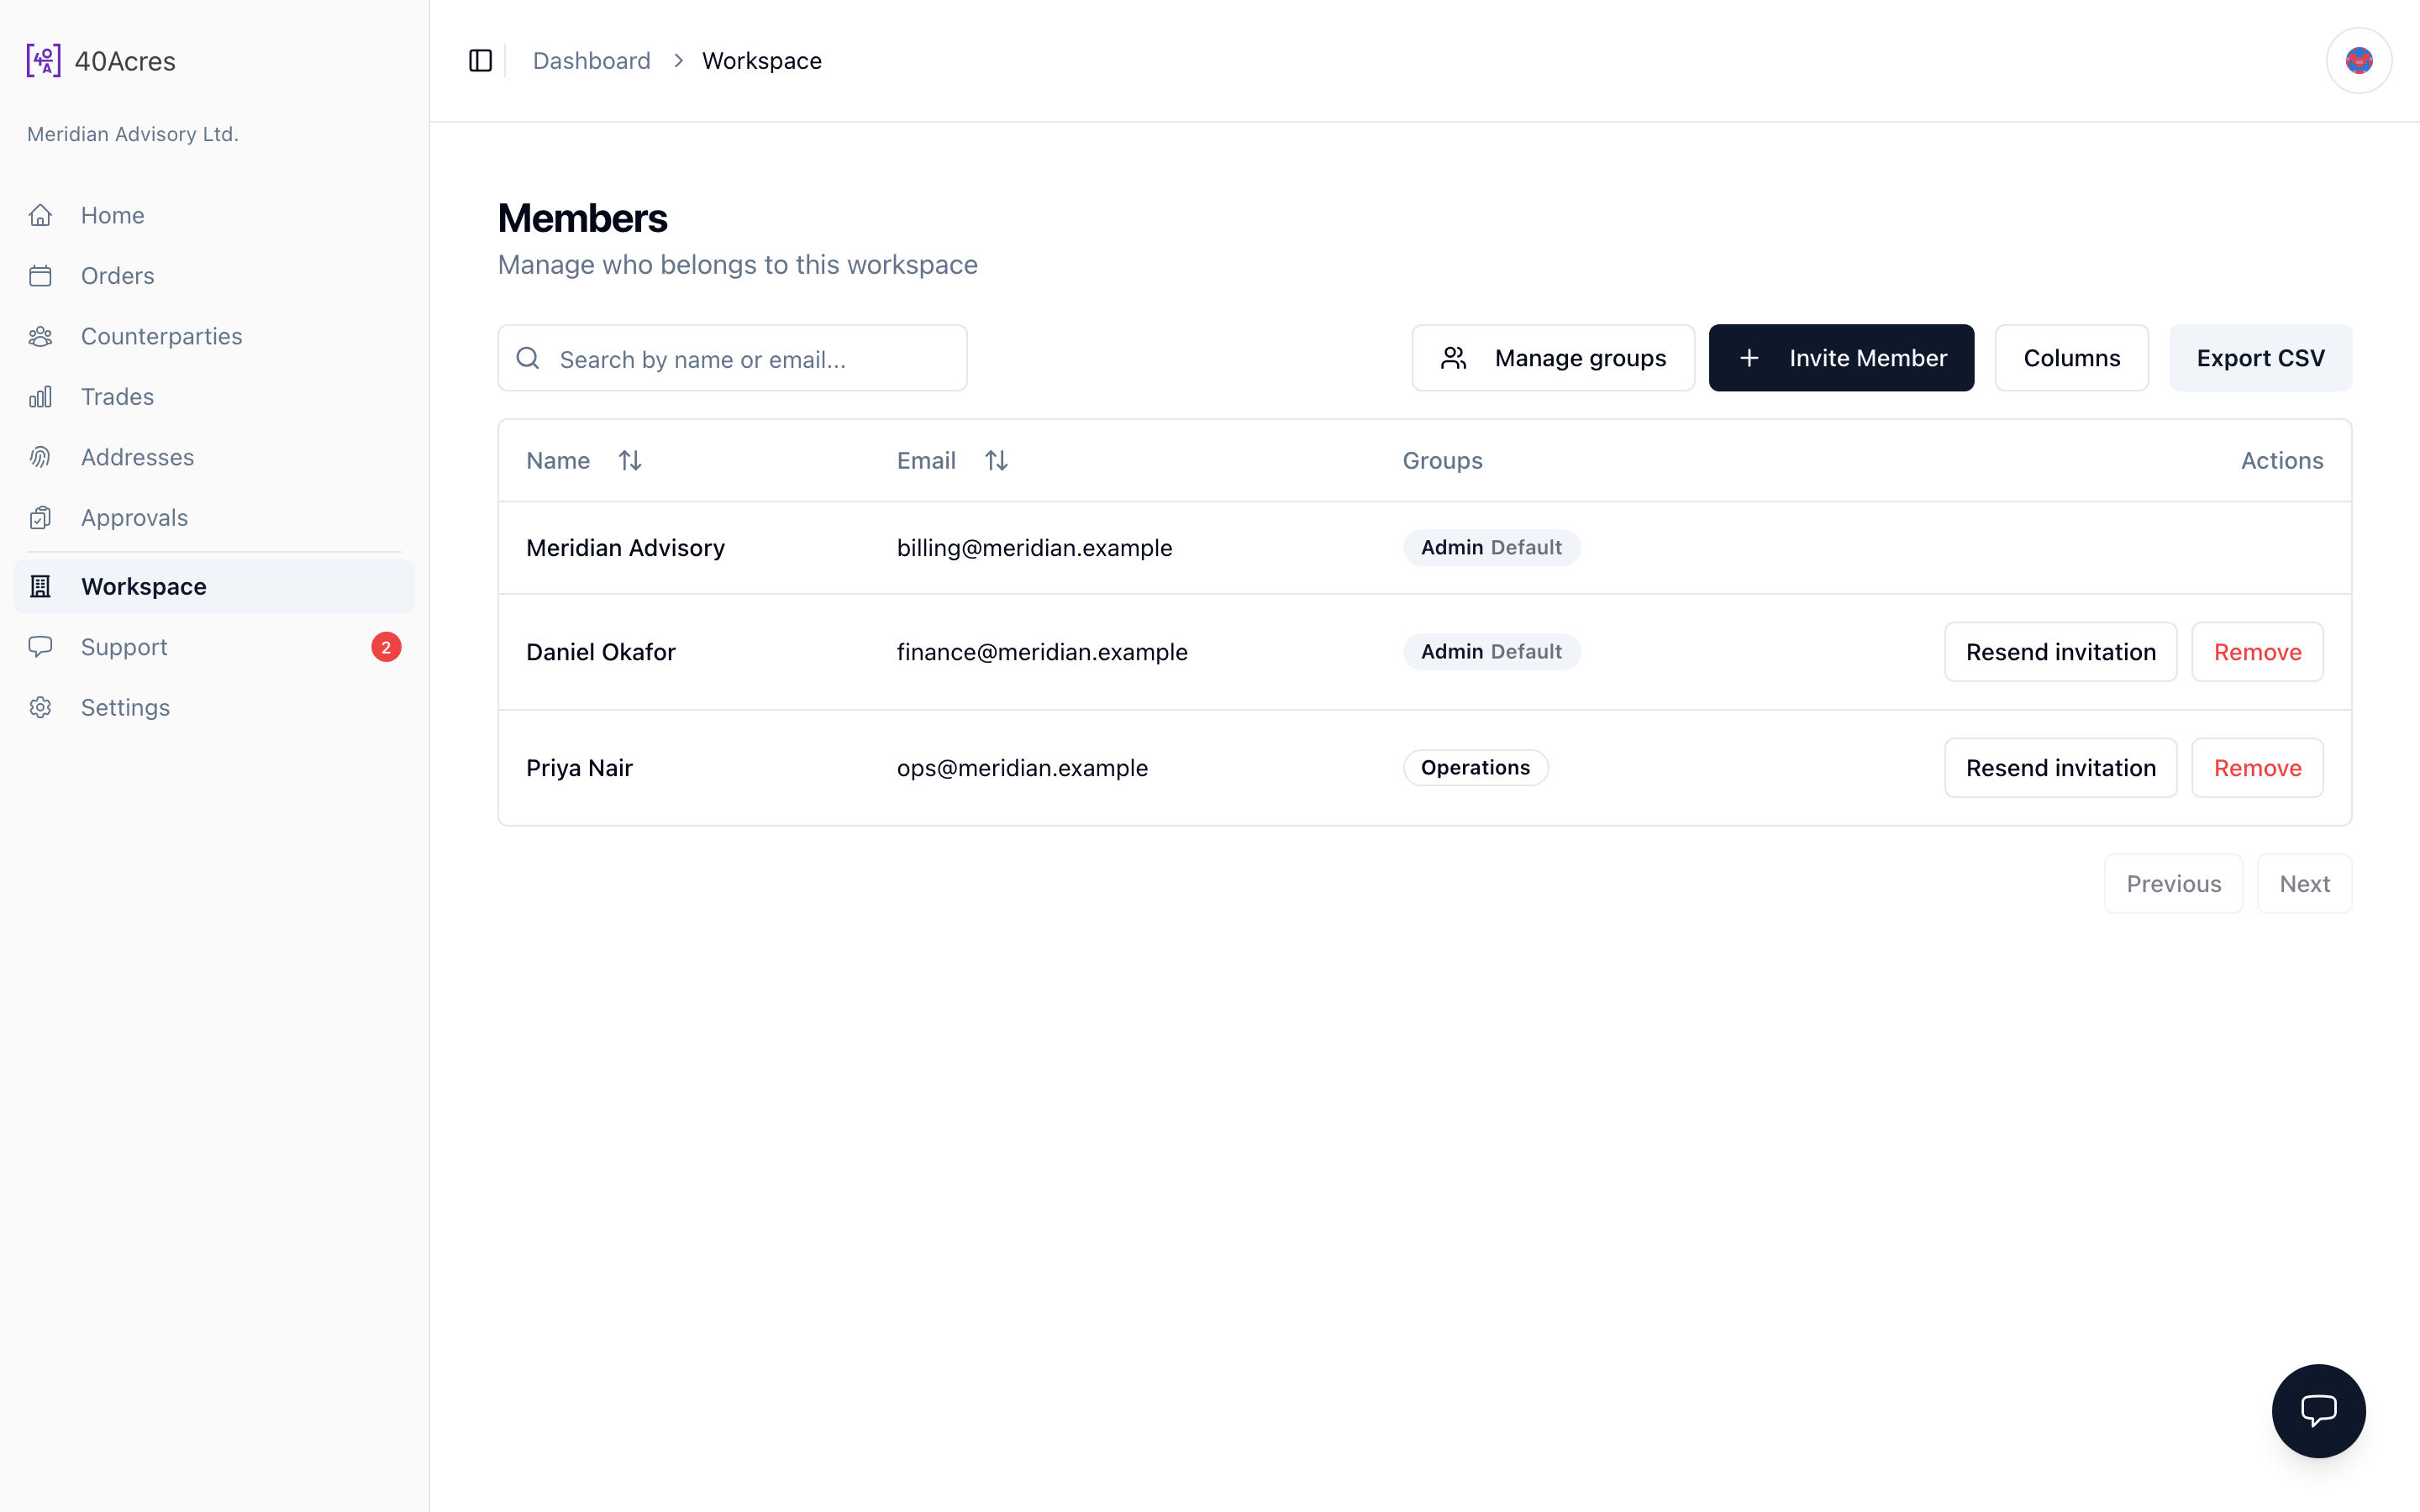
Your workspace is your company's shared account: every member signs in with their own credentials and works on the same orders, trades and addresses. The sidebar shows which workspace you are in — people who belong to more than one pick one at sign-in and can switch there any time. The Workspace page lists the members, each with their permission groups; it is visible to members with administration permissions. Invite Member adds a colleague by email, and each member's actions menu covers the rest — Edit groups to change what they can see and do, Reset password and Reset 2FA when they are locked out, Resend invitation while one is pending, and Remove. Manage groups is where administrators define the permission groups themselves. Removing a member, or changing their groups, is refused if it would leave requests nobody could approve — keep at least one other approver for each kind of request your workspace requires sign-off on. Members granted order or trade create or approve permissions are the workspace's authorized representatives: a banner walks them through a short verification form, and those permissions unlock once the 40 Acres team approves their authorized-representative status.
- Invite a colleague with Invite Member — they receive an email and join with their own login
- Set what a member can do via Edit groups; define the groups under Manage groups
- Use Reset password / Reset 2FA to recover a locked-out member, or Remove to revoke access
Support
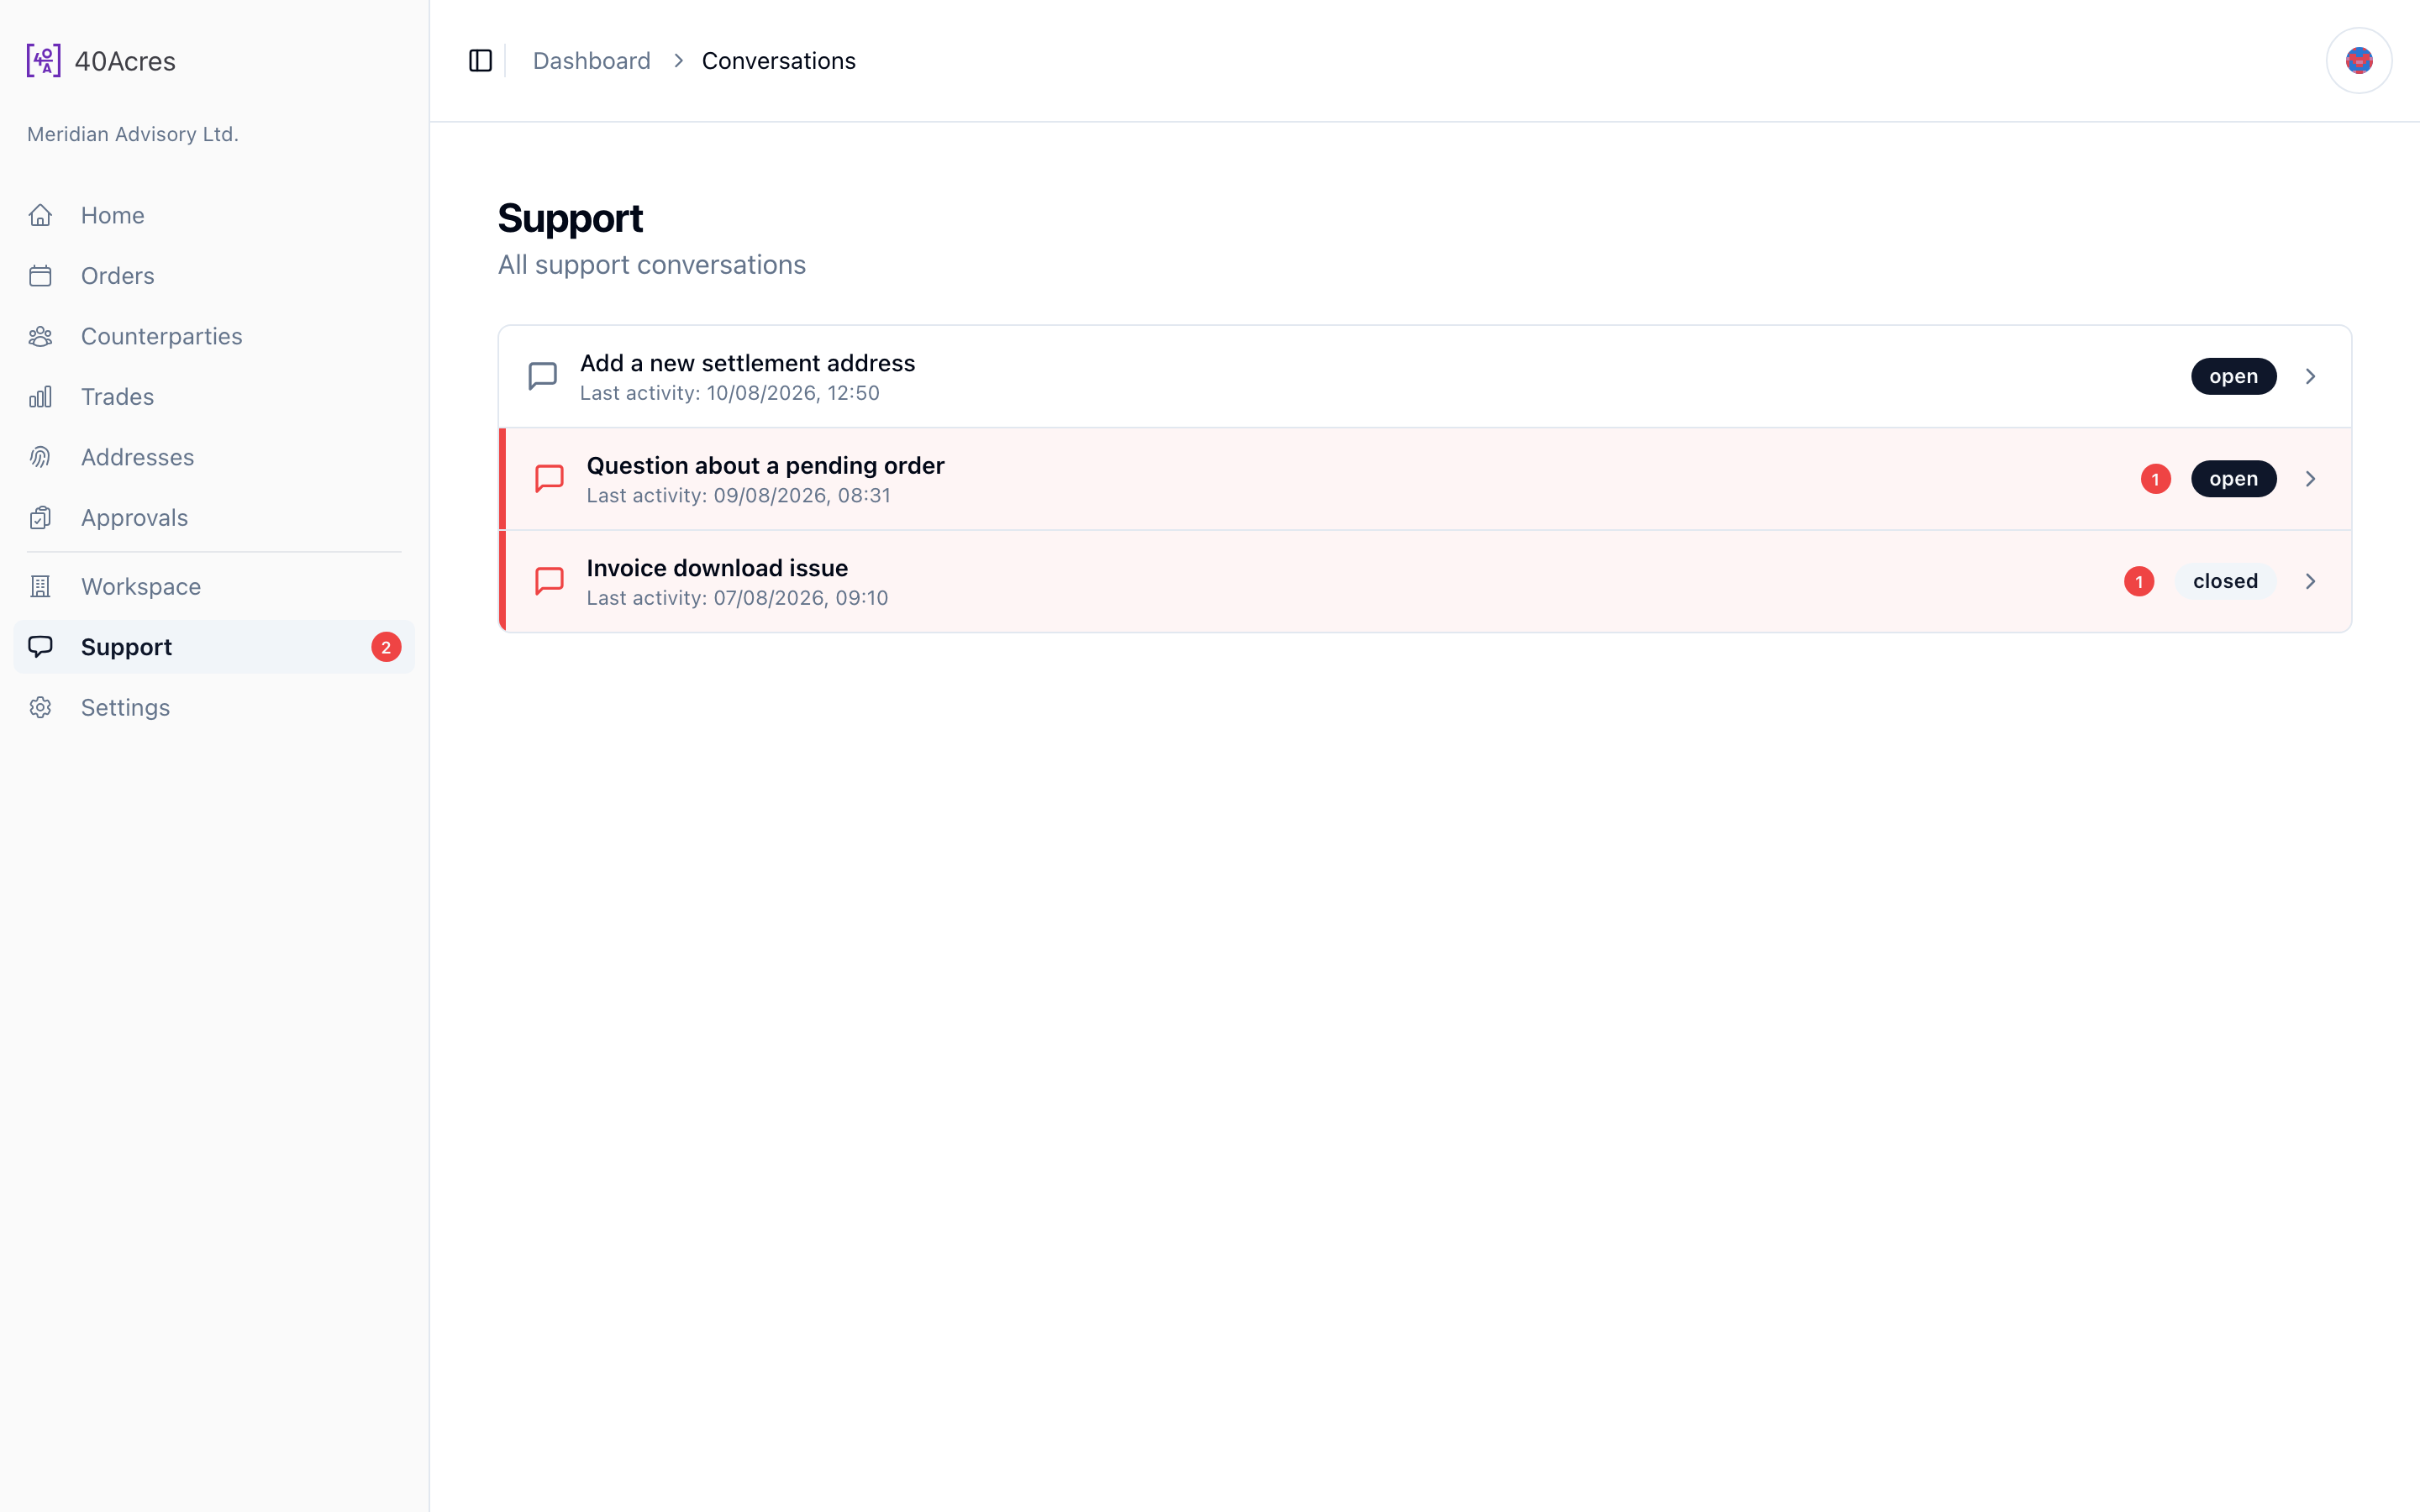
Help when you need it. The support assistant replies instantly, any hour, and can check your orders, trades, verification status and account details while you chat. Ask for a person at any point and the conversation is handed to the 40 Acres support team; sensitive topics go straight to the team automatically. You can delete a message you sent — with a short window to undo — and a copy is retained for compliance. You can also email [email protected].
- Ask the assistant first: it can check your orders, trades and verification status instantly
- Ask to speak to a person at any time; the team replies during support hours
- Email [email protected] for anything urgent
Settings
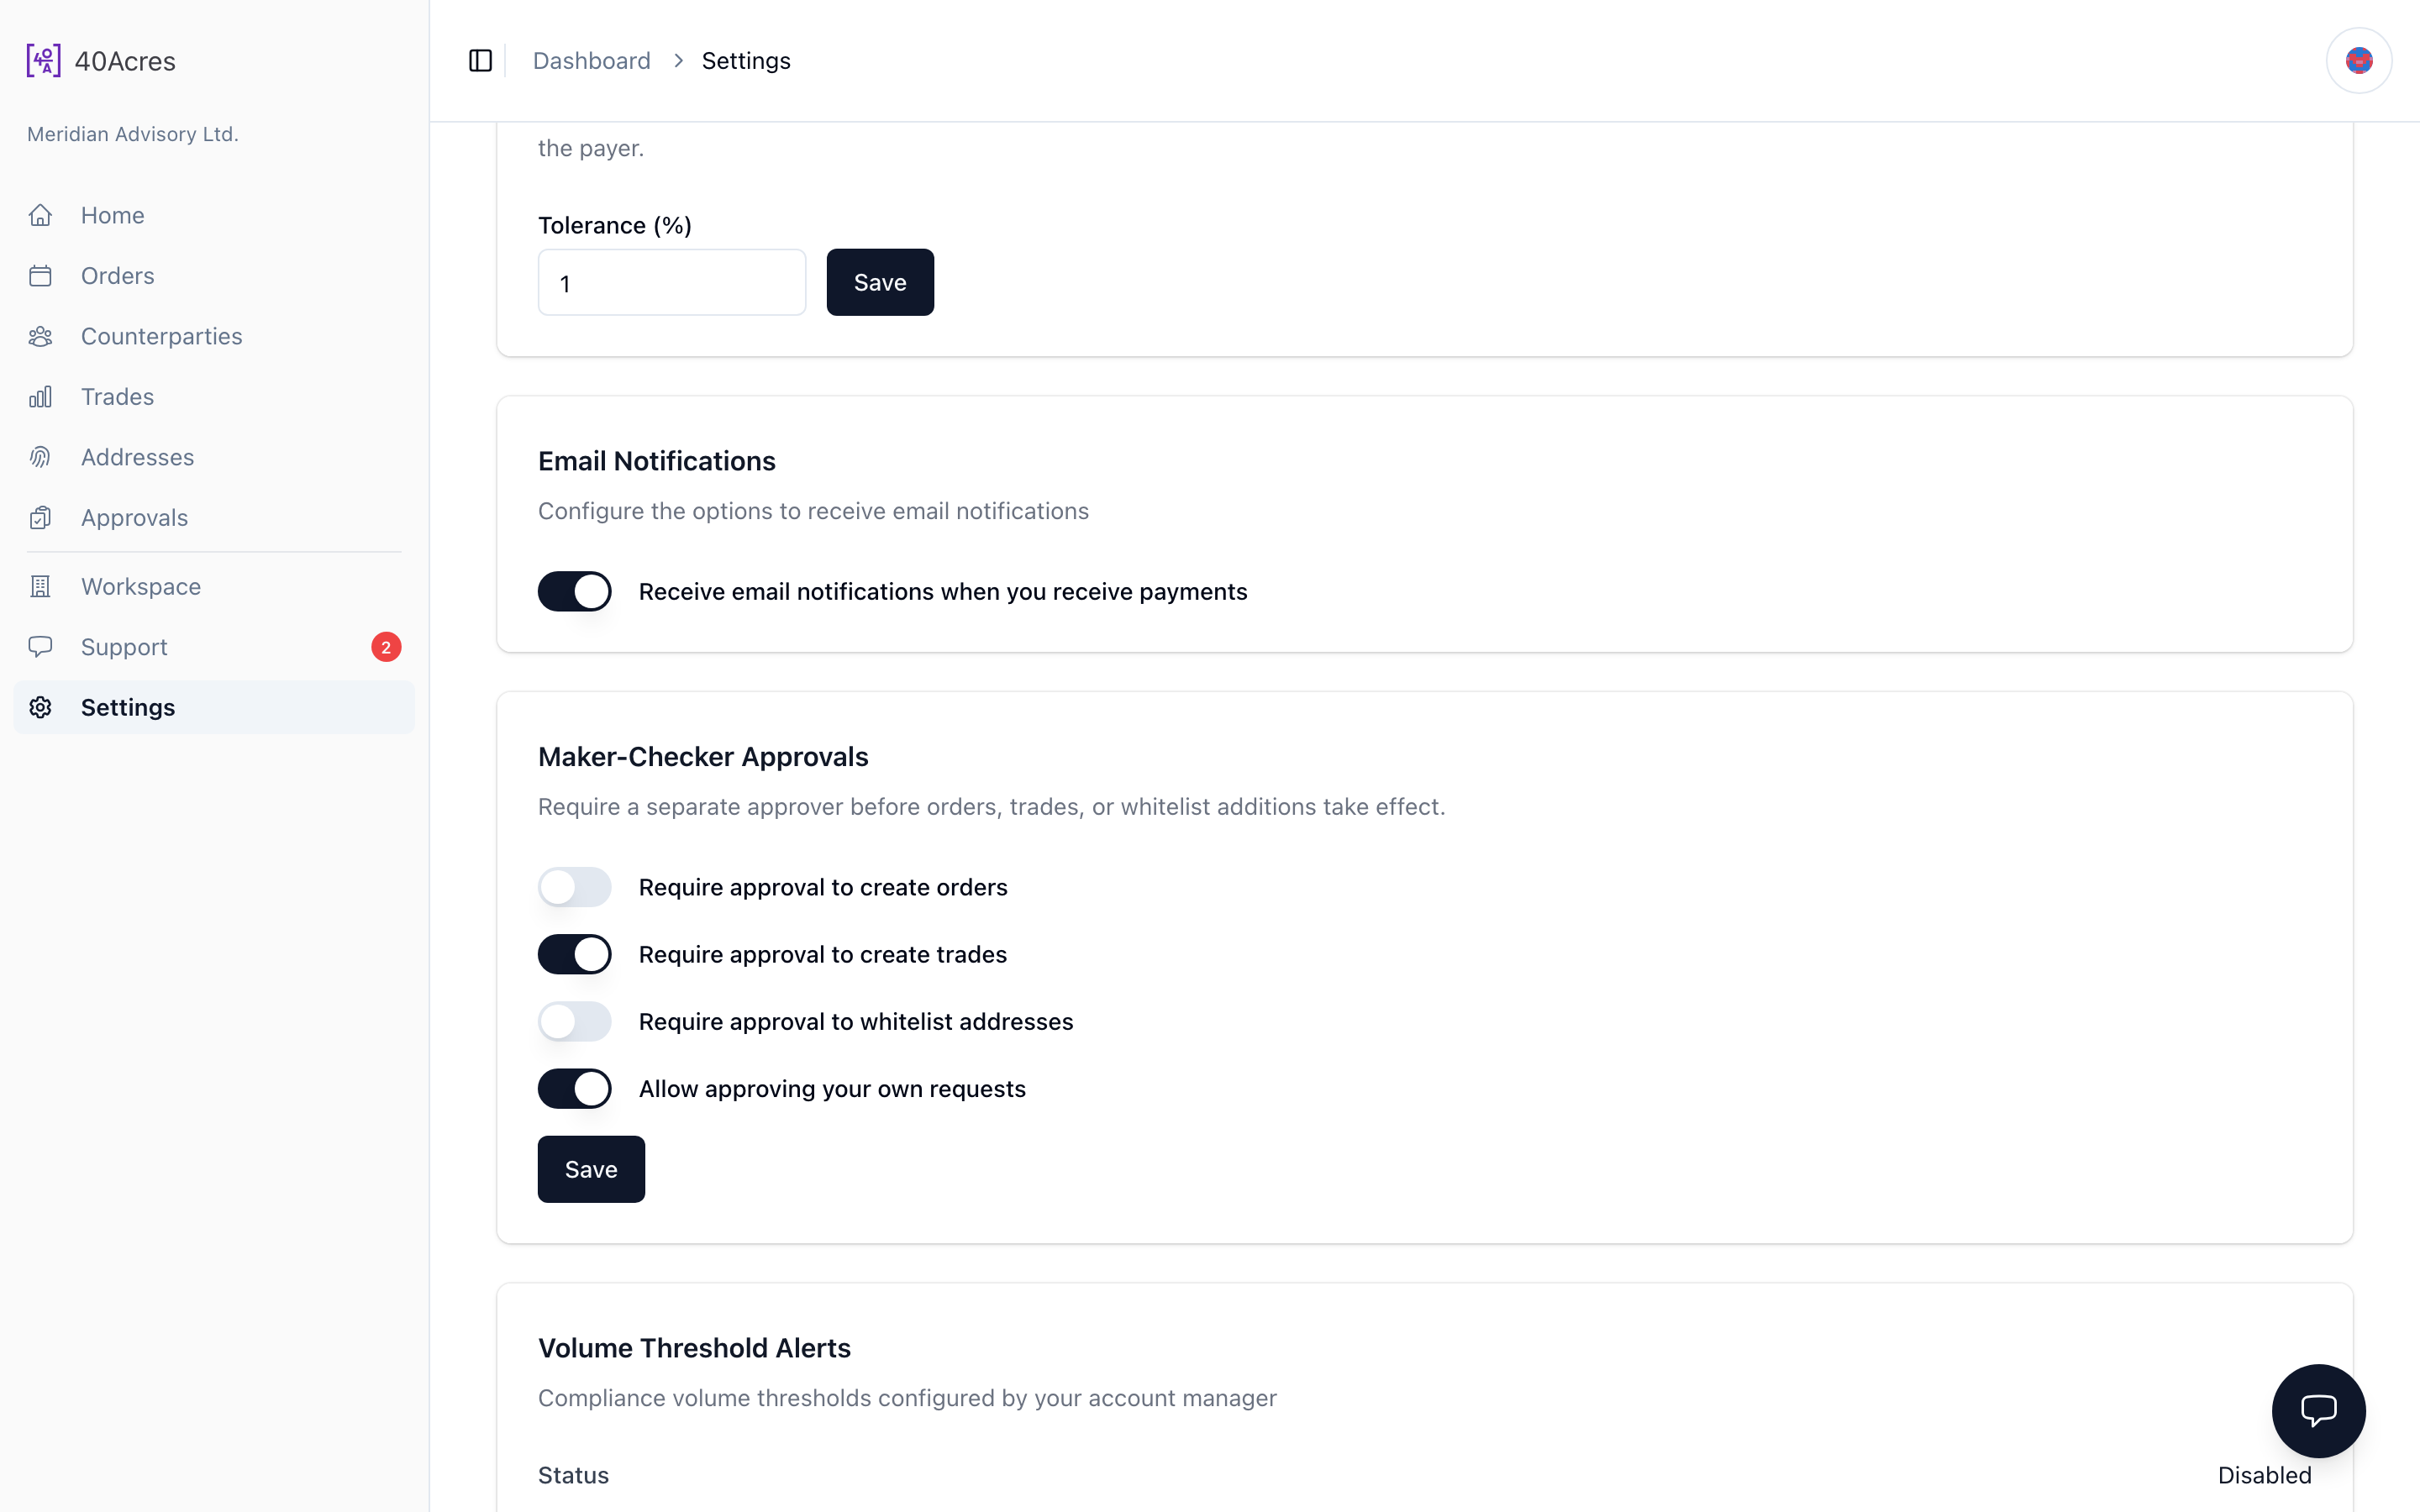
Account and security controls: your company profile (shown read-only — ask 40 Acres to change it), allowed networks with the assets each carries, notifications, and password and two-factor reset requests. Notifications lists every email you can receive, grouped by area, with a switch for each: optional ones such as payment received, invoice paid and trade completed can be turned off, while important alerts such as a new whitelisted address are always sent and show as locked. Additional recipients sends copies of the emails you have enabled to up to 5 other addresses, each of which must confirm by email before it receives anything. Password resets go through Forgot your password? on the sign-in page: the emailed link asks for your authenticator code before a new password (at least 12 characters) is accepted. If you have lost your authenticator device, request a two-factor reset from Security instead. The Maker-Checker Approvals controls decide which actions need sign-off (orders, trades, whitelist additions, and whether self-approval is allowed) — editable with the workspace-settings permission. A combination that would leave nobody able to approve a required kind of request is refused when you save: keep at least one member who holds the matching approve permission and is not the only person submitting, or allow self-approval. For your security you are signed out automatically after a period of inactivity — a Still there? prompt appears shortly before, and Stay signed in keeps the session going. New accounts default to the Ethereum network with USDT and USDC enabled.
- Two-factor authentication is always on; request a reset from Security if you lose your device
- Switch optional emails on or off under Notifications; locked ones are always sent
- Review your allowed networks: accounts default to Ethereum with USDT and USDC
- Set which actions require approval under Maker-Checker Approvals
Screens shown are illustrative and generated from example data — no real account information appears in this guide. Sections showing a placeholder are awaiting an updated screen.